Tuesday, July 31, 2012

Making Music: Sony ACID & MIDI

Marc Pedone
- ITA Instructor -

Day 1

Today was an introductory day of Sony ACID, a music production software. Many of the students interested in this choice session have already expressed their interest in making music through using music production software or being a part of their school band. We discussed many different parts of songs including the time signature 4/4, beats per minute, and how certain sounds can either be on beat or off beat.

We also discussed the structure of current songs. We talked about the introduction, verses, pre-chorus, chorus, and bridge. We then found a current song (All Of The Lights - Kanye West) and had the students see if they could pick out the parts by just listening to the song.

Next we listened to all the different sounds involved in making the beat of this song. The students were able to pick out different horns, synthesizer, and bass. This allows the students to think of the many sounds involved in making an overall track.

After this, we went though some tools to allow the students to start making some music by going through loops, one-shots, reverse, and changing pitch. As the students started playing with they were given a group of loops and one shots provided by ITA, however they were then showed different sites where they can acquire their own loops.

www.looperman.com
www.djpain1.info

This is an example of loops the Valeria put together.


Day 2

Today we introduced to the students how to use MIDI controllers with the Apple software GarageBand. They used the controllers to make both drums and loops. GarageBand also allows you to to use your keyboard as a controller, but is easier with the MIDI controller. After much time of trying the controllers out for the first time, the students got to have a challenge of partnering up and trying to come up with some sounds.

Day 3

Today we focused on VSTs and Soundfonts in Sony ACID. The Students were able to use the MIDI controllers in ACID and download different sounds for the program. These sounds have a very wide range and allow the students to really take control of different loops they can make. Here are some examples of some loops made by an ITA student using Sony ACID and VSTs.


This is just the first step on getting students to create their own music from scratch!

Friday, January 6, 2012

Berbee Derby - Team ITA! (update / re-post)


AJ Daughtry Krill
- Lead Tech Instructor -

This November, we had an ITA Team participate in the Berbee Derby again!

We thought we'd update with you with how the experience went, through the words and photos of one of our students. She participated in it last year as well, and here's her story from this year's event:

The Berbee Derby was lots of fun this year, just like last year. My brother and I got up early thanksgiving morning to run (a true accomplishment for my brother, who usually sleeps in until noon on weekends). The motto for them is "just like a thanksgiving day parade... only faster!" and that's exactly what it is!  Imagine yourself, racing past people with turkey costumes and all other kinds of thanksgiving getup! It's so much fun, and it's a great experience because there's usually someone you know there who you didn't even expect to see!  I saw some people who go to my school right before the race started, and I got to say hi to them. I ended up seeing my uncle after I finished the race, and I found out he ran the 10k. I didn't even know my uncle ran at all, so it was a pretty cool surprise. It's always kinda chilly, but that's just part of the fun of running on thanksgiving! You should definitely run the Berbee next year!

Also, here are some new photos:


PREVIOUS POST:

The IT Academy has recently received a generous grant from the Technology Education Foundation that the Berbee Company set up and endows with the proceeds of a charity run/walk called the Berbee Derby.  ITA was also the very first recipient of grant funds from TEF back in 2004!  For the past two years and into the future, to show our support and gratitude, ITA has been organizing an ITA Team to participate in the Berbee Derby!

The event takes place on Thanksgiving morning, at 9 a.m., starting at the Berbee campus in Fitchburg. Participants can register for either the 5K run/walk or the 10K run.  Cost is $25 and it includes a Berbee Derby event t-shirt that is personalized with "Team ITA" printed on it.

Different staff members, DoIT collegues, and ITA students along with their families have participated in the past two years!

Here's what one ITA student had to say about her experience:
The Berbee Derby was a great experience. Sure, it was on Thanksgiving morning- but that's part of how great it was! There were so many people there of every imaginable athletic ability, old and young alike. It was pretty cold, but we were mailed these nice little hand warmers and some complimentary toffee along with our Team ITA t-shirts (which are very cool!). The atmosphere was very fun, and they had a tent with coffee for those of us who don't wake up that well. I also saw some friends I didn't even know were coming!

The best part is completing the race. You watch as each and every person crosses the finish line, and everyone looks so happy! And, it doesn't matter what time slot you are given. Finishing and achieving your goal is all that matters.

I'm really glad I came, and next year you should come too!
It sounds like it was a great experience for her and her family to share!


If you are interested in the Berby Derbee, check this out:
View this Slide Show from the 2010 Event!


Stay tuned to find out if there will be a Team ITA in 2011!

~ITA Staff

Friday, December 9, 2011

Cereal Box Design

April Arevalo
- ITA Tech Instructor -

Elements of graphic design can be found everywhere. What better way to teach the students about all the elements of graphic design than by making themselves into what, I hope, gives them the copious energy they have every Saturday morning; a cereal box.

The purpose of this project was to advertise each student in a complete styling. The students didn't necessarily have to be a cereal product, but some students did get creative by adding many aspects of them as a real cereal brand.

The cereal box was split up with each session focusing on a different part, and mastering the same tools that could be applied to the entire cereal box.


Front of the Cereal box:
On this side, the students created digitized self-portraits of themselves. The main tool used for this was the pen tool, a very useful but challenging tool. The students learned very quickly that, while frustrating, this tool can create great, detailed artistry. Starting with a picture of themselves, the students essentially traced over the picture to recreate the image. Still, they would tell you that it is not as easy as it seems. The pen tool requires a keen eye, an understanding of anchor points of curvature of a line, and the use of layers.

After practicing this tool several times, the students were able to tame it and create digitized versions of themselves that looked great.This is a picture of a student, as a final digitized image.


Back of the Cereal box:
In this section, the students created a typographical map of their neighborhood and nearby areas. This section again focused on the pen tool but introduced new elements such as a "clipping mask" and "type to path" tool. The students really developed their pen tool skills in this section. In order to make a typographical map, the students would outline the shapes present in the image of their neighborhood. Then, they would use a new layer to write text of the area they were covering up, i.e. parks and street names. Then, selecting both layers, they would create a clipping mask that would cut the text to the shape they outlined and color it as the shape was colored. The students repeated this for each section of their map.
This is a map of a student's neighborhood entirely made up of text.

Sides and Panels of the Cereal box:
After giving the students a very structured front and back of their cereal box, they were given more freedom for the rest of the box. Keeping in mind that they were creating a cereal box, many of the students created "nutritional facts," based on what makes them who they are. They also started to think of images that could portray aspects of importance to them, such as religion, school spirit, and other things of interest.
These are the side panels for another student's cereal box. She chose to draw her journey at ITA on one side of her cereal box.

For the final result of the cereal box, the students were asked to think about color schemes throughout the box and overall presentation. They are portraying themselves and need to think about what makes something aesthetically pleasing. The majority of students still have some tweaking to do, in order to make their boxes as presentable as possible. In using a website known as "dropbox" the students are able to work on their projects at home and can send us a complete cereal box that they put time into and would be proud to show.

The students came a long way and have begun to understand what it takes to make a complete piece of work/art. This is a great structure for the projects to come in their ITA career.

COMING SOON:
Below are some photos of the actual cereal boxes! We displayed them at this year's 12th Annual Holiday Luncheon:

Wednesday, October 26, 2011

Exploring Aviary

Felipe Gacharna
- ITA Tech Instructor -

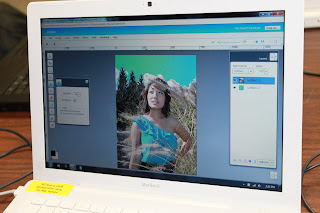
For the October 22nd ITA session, students had the option to join a choice session that explored Aviary. Aviary is a free online set of tools that allow for image editing and creation as well as music editing and creation. In particular, students got to explore the Phoenix photo editor, similar to Adobe Photoshop, the Raven vector editor, similar to Adobe Illustrator, the Myna music creator, similar to Sony ACID, and the Peacock effects editor, which is unlike most programs the students have experienced before in ITA.

All the Aviary software runs in a browser and is free for anyone to use! We used the specialized education version to great success, which allowed us to oversee much of what the students were able to accomplish in this session.

This student was very proud of the work she could do to her photo in a web browser software:


Phoenix (like Photoshop)


Phoenix has many of the same features that students have already learned in Photoshop, including layers, blending modes, filters, and the clone stamp tool, to name a few. In Phoenix, students got to play around with a base image of a hot air balloon that I provided.

Using the hot air balloon image, students were able to duplicate some of the functionality they are familiar with in Photoshop and then take it to another level with the Peacock effects editor.

Peacock (a unique photo editing tool)

You can "push" a layer from Phoenix directly to Peacock, edit the layer in Peacock, and then send it back to Phoenix. Here are some pictures of the edited hot air balloon image as well as a screen shot of the Peacock editor, showing the unique user interface.


These edited balloon images showcase some of what you can do with Phoenix and Peacock.


This screenshot of Peacock shows the "node-based user interface" that the tool uses. It's a rather unique user interface (UI) where the user is provided with "nodes" or blocks which they can manipulate. Nodes can be connected through the little "notches" on the top and on the bottom of each. These "notches" are inputs and outputs. Manipulating the inputs and outputs to each node allows for heavy manipulation of images, and since each node has its own properties that can also be manipulated, the user has a lot of power in creating a desired effect.

Here's another screenshot of Peacock showing the nodes more clearly and some manipulation done to a gradient.


Myna (sort of like Sony ACID or a drum machine)

The Myna music creator allowed students to mix sounds from a large library to create beats. Myna provides a simple interface, with several layers of different sounds and each sound having a track, with beats being on or off for a given beat. Volume can be tuned for each sound as well as for each particular beat, so students have a good amount of power in mixing their beats. Here is a screenshot of one of the beats created by a student as well as an over-the-shoulder picture of one of the students working on his Myna project.


Listen to some beats the students made:


Aviary also provides a Hall of Fame where anyone can look through submissions, as ranked by users. Most of the time, the projects actually allow you to open up the program used to create it so that users can view how the project was created. Students had an opportunity to look through the Hall of Fame to see what could be done with the tools they were using and to help them gather ideas of how they could achieve some effects in their final artifacts by looking through the projects that allowed you to see how they were created.

Introducing: After Effects

April Arevalo
- ITA Tech Instructor -

After Effects is a complex program that has endless possibilities of what can be created. I tend to focus a lot on text, not just what the text means but also the aesthetic feel of the text. This session I wanted the students to become familiar with the navigation and some of the functions of After Effects. The plan for this session was to give the students a basic structure of how to do a space warping text. Once the structure was complete, the students had the freedom to enhance their animation with a variety of options.

Although I felt the structure was confusing at times the students had no trouble in asking for clarification and getting back on track. Because of the complexity of this software, I had to be pretty strict about exact values for many parts of the project. However, the students were clever and had their own interpretations. They successfully came up with different text paths, styles, and compositions. This picture is a sample of a movie title as it enters the time echo effect that causes it to look like it is warping.

Once the structured part of the lesson was complete and the students were introduced to backgrounds with masks and the particle world the creativity really began to flow. Approaching these two elements in more of a broad sense while still highlighting major components really played to a key aspect when using After Effects. Creating effects that are visually engaging in this program calls for experimenting or simply just playing around with the effects. The difficult part is that it requires a lot of computer processing power, so it can be a little slow going to experiment and see the results right away.

As the students dove into adding backgrounds and different particle elements it became clear that the structured part was needed and that this freedom would add another level of complexity to what the students had already made. This student made something simple look very cool and colorful.
Overall the students engagement, curiosity, patience, and creativity really made this session more than I had ever anticipated. Hopefully since this was the first session ever to use the program After Effects when other sessions are offered the students will be excited to learn and create what ever the focus of that session happens to be.

Annual ITA Halloween Costume Contest delivers more treats than tricks

Alison Wilson
- ITA ACT and College Prep Instructor -

Each year, ITA encourages students to look deep within themselves to come up with the BEST Halloween costumes possible. While few students participated this year, the costumes did not disappoint. Not only did these students have the opportunity to go trick-or-treating in each of their classes, but ITA staff was on the lookout for the most creative, fun, inspiring, or well-executed costumes.

Without further adieu, I present to you the Halloween Costume Contest participants of 2011!

This student sported the unofficial uniform of the US Women's soccer team.


The classic masquerade mask for a sophisticated costume. Also, she loves trees...


It was impossible not to smile when walking past Dipsy, the green Teletubby.


Here is a very convincing crusader, complete with sword and chainmail!


I’m not even sure who this ninja was; this costume was just that good!


Wow! Nice interpretation of Raggedy Ann, red Converse and all! You rock!


Arrrrrr, mateys! This here be another ITA student as a pirate!


We even had a mime costume. And, some nice miming talent along with it!


With so many AWESOME costumes, it was difficult for staff to choose the winners. In the end, it all came down to just a few votes…

Our runner-up is a TIE between Dipsy and Raggedy Ann. Each of them will receive a $20 Best Buy gift card!

This year’s costume contest winner is the robot from LMFAO’s “Party Rock Anthem” music video. He will receive an iPod shuffle and a $15 iTunes gift card!


A huge thanks to Mary, Sarah, Brianna, Brenna, Ian, Ninoska, Adrian, Josh K., and Islam ! You will each receive a raffle ticket for the End-of-Semester prize raffle!!

Photos by: A.J. Daughtry Krill

Sunday, October 23, 2011

Computer Security

For the first choice session of the year, a workshop focused on computer security titled Hack This! was offered.  The session began by looking at a comparison of families of operating systems.  A diagram of UNIX and Unix-like systems can be found here.

Here are some of the major topics we covered in class to give students a better understanding of how computer security works, and how to stay safe in a deeper level than we usually have time for...

Windows Password Security
Losing a Windows password happens quite often, especially when the user is no longer a part of the organization, or has simply forgotten the password for the only administrator account on a rarely-used system.  There are several options, which you can research on your own. Our students got to try a few. It was helpful for them to learn just why it's so important to have not only a good password, but other layers of protection as well.

Mac Password Security
Mac has the reputation of being pretty secure and safe, but their efforts to be as user-friendly as possible and building everything on a UNIX platform platform have left some vulnerabilities.
In order to gain access to a Mac with a lost administrator password, the best way is to use the Mac OSX Install disc that came with the computer. There are other ways to secure your Mac and help you to remember your password that the students had a chance to discuss as well, including encrypting actual files as well as the OS.

Cracking file-level passwords
While we discovered that user passwords for operating systems are rather unsecure, password encryption for files can be very difficult to crack. We looked at the differences between methods of password cracking, such as Hash decryption, Dictionary set, and Brute force.  More information on these methods can be found at: http://en.wikipedia.org/wiki/Password_cracking

Students had a much better understanding of how threats to security occur, and they learned the importance of being very careful when storing information, especially sensitive information.

Live CDs
We booted our computers using Puppy Linux and Knoppix, though we discussed the use of even more alternatives, such as Ubuntu derivaties that can run live, as well as BackTrack, DEFT, and MilaX.  A more complete list of LiveCDs can be found here.  These live CDs are ways to boot a computer with a non-functioning operating system and access the hard drive.  They are an important part of any IT toolkit for retrieving data and also running a full virus scan that can check for rootkits while the primary operating system is offline. With these tools, students can learn a really safe way to recover important work they thought they had lost to a virus or other OS corruption!

Internet Security
We took a tour of www.whatsmyip.org to explore some of the information that is passed on to a website about every visitor and ways that one can protect a computer against malicious attacks by testing what vulnerabilities exist.  Using this website, we were able to discuss how to make passwords more secure, geolocation, proxy servers, MD5 checksum.  This also led to a discussion to ports, firewalls and creating a DMZ using a dual-firewall setup.

In the End
Of course, our conversation went to all sorts of places, and our students seemed to learn and share a whole lot about the way computers work, the way to work around that, and most of all the importance of having a better understanding of this still somewhat new frontier of online life.