On December 4th and 11th, one choice session was a unit on making video commercials, giving the students a chance to learn something about the art of advertisement. It was good to see that we had an almost 100% attendance, considering the weather, and everyone was bright-eyed and ready to get some video editing done!
We started with a brief primer on advertising concepts, with the students learning about brand recognition and the necessity of economy of information. Commercial makers don't have a lot of time to get their point across to an audience, especially due to cost to buy air time, so we really wanted to enforce a strict time limit on their projects. We followed the lesson with some examples of famous commercials, including the 1979 Mean Joe Greene Coca-Cola ad and the 1984 Macintosh commercial. We talked about the specific principles involved in each ad--what worked, what didn't, what kind of effect the commercial had, etc.
Here's the Coca-Cola ad:
And, the Mac ad:
With all of this information to arm them, the students launched into their projects. To leave enough time for the 11th Annual Holiday Luncheon, the morning session had twice as much time as the afternoon session did, so the afternoon session was really under the gun when it came to their work.
As a result, the morning session went a little higher on concept, with a lot of recording being done, but not a lot of editing. The afternoon session performed with flying colors, all three groups finishing their project by the end of the class. Yay for them! Impressive work!!
Here are the projects that the afternoon class completed:
Great work, everyone!
Sunday, December 12, 2010
Tuesday, November 23, 2010
Adobe Illustrator - Class of 2014
Chou Thao
ITA Technology Instructor
The Adobe Illustrator class allows students to take a sketch of their own (done with paper and pencil) and digitize it onto a computer using Illustrator. This doesn't mean that someone who wants to learn to use the program has to be a great drawer or artist. Illustrator has a bunch of tools for artists and non-artists alike to make professional and interesting graphics for tons of purposes, from print to web!
The Illustrator class was split into two classrooms taught by Chou, Cristina, Marc, and Tenzin. The first project's main goal was for students to get comfortable with the program and get a feel of how it works. The assignment was to create your very own penguin character using pre-made symbols of penguin parts. The results were amazing as students used their creativity to make unique penguins.

As the class went on and students learned the various tools the program offered they realized the difference between vector images and raster images. In Illustrator vector images can be made from raster images by utilizing the live trace tool. Students were put into groups of four and asked to use this tool to create a "four seasons" piece. They "live traced" one picture and color it in with the colors of the season they were assigned from their groups. The four seasons project was interesting because of how each student portrayed the same season with their unique perspective.


The students were learning Adobe's CS5 and they got a chance to test out the new perspective tool. Using the perspective tool students were able to create a city block with two different angles and create a 3D effect. Students picked up this tool very quickly and created some nice work.
To show what the students gained from the Illustrator class, they were asked to create a web site layout from scratch using Illustrator. This was a little bit of a challenge because the students have had very little experience in how websites are created, but after a few examples ideas started to pop.
Sunday, November 21, 2010
Radio Commercials
Radio commercials are much different than any other commercial or ad because they only get to use sound and utilize the sense of hearing. They must grab the audience's attention without having them see anything, which is quite a feat!
The students first focused on writing a script. They thought about what goes into a script and what they should focus on. They learned some of the main questions to consider when script-writing:
After the students set the stage, the students must say what their product is and the facts that make it the best product available. This is the "meat" of a commercial as it is the most important part for getting the consumer interested in the product.
The last part of a radio commercial is a call to action, or telling the person to buy the product.
This is a sample "call to action" that one student wrote:
The students then got to focus on recording their commercials along with a new competition set-up. Each student all had access the same sound bytes of other ITA students talking about Madison, WI. They then compiled them into a sort of PSA for the city of Madison. Then, each student was to choose a music to create a mood from SoundCloud.
The whole process of making the PSA focused the students on the production of radio commercials. The winner was determined by the ITA Staff, which was Natalia. Her prize was a honorable congratualtions, and her commercial was played before all our guests at the 11th Annual Holiday Luncheon!
Enjoy all the Madison PSAs made by the students:
ITA Students PSAs
The best part about the experience for the students is that although we didn't have time for them to finish both of their commercial projects, at least they know how to make their own all the way from product to script to final production!
The students first focused on writing a script. They thought about what goes into a script and what they should focus on. They learned some of the main questions to consider when script-writing:
- Who's the audience?
- What's the product?
- What's the message?
After the students set the stage, the students must say what their product is and the facts that make it the best product available. This is the "meat" of a commercial as it is the most important part for getting the consumer interested in the product.
The last part of a radio commercial is a call to action, or telling the person to buy the product.
This is a sample "call to action" that one student wrote:
"Little Litter Robot! Available for only 5 easy payments of $29.99! So pick up your iPhone and call 1-800-NO-LITTR, N-O-L-I-T-T-R, right now! That's 1-800-665-4887"
The students then got to focus on recording their commercials along with a new competition set-up. Each student all had access the same sound bytes of other ITA students talking about Madison, WI. They then compiled them into a sort of PSA for the city of Madison. Then, each student was to choose a music to create a mood from SoundCloud.
The whole process of making the PSA focused the students on the production of radio commercials. The winner was determined by the ITA Staff, which was Natalia. Her prize was a honorable congratualtions, and her commercial was played before all our guests at the 11th Annual Holiday Luncheon!
Enjoy all the Madison PSAs made by the students:
ITA Students PSAs
The best part about the experience for the students is that although we didn't have time for them to finish both of their commercial projects, at least they know how to make their own all the way from product to script to final production!
Saturday, November 20, 2010
Sound in Film
Sound in Film is a class that aims to improve all aspects of audio in student films. Students learned about professional film sound, multiple sound layer editing, techniques to help achieve common audio effects and how to put it all together on screen.
Students came into this course knowing little to nothing about professional audio editing. They were first introduced to professional examples of sound design. Here are a couple examples from the film Star Wars.
Students learned how to film dialogue with multiple angles and using multiple takes. This allows for easier audio editing in post-production. Then, the students learned about ADR (Automated Dialogue Replacement) or overdubbing all the dialogue in a film. They learned how to use high quality microphones to produce better sound than what is recorded from internal camera microphones. In this case we used the Zoom - H2 audio recorders, which are a great product and reasonably priced!
The students were then challenged to create their own film project, using their own scripts. Here's the catch: all the audio had to be created in post-production. This means that no audio captured during filming was allowed to be used "as-is." There were 4 groups and only 2 of the groups considered their projects complete. It was a challenging task that required hard work and dedication. It also required time, and sometimes we run out of that fast. And, although some of the final projects didn't turn out in the end, the learning along the way was invaluable. Students also learned the hard work and pre-production required to finish a project for a deadline.
Here is Clara and Lucy's final project, a trailer for an original gripping feature film called Code Red. It's an upcoming thriller (not really) about foiling a planned attempt to assassinate the president. (Spoiler Alert!) We asked, and he ends up being unharmed in the movie.
Thanks for reading!
MS Excel Last Day!
Paul Christopher
ITA Technology Instructor

This morning’s session was Elizabeth’s first session in a month, so she had a bunch of stuff to do in catching up with the students. We talked about what we did between sessions, and what our plans were for the Thanksgiving holiday. Anny is participating in a Hmong New Year celebration, but she’s not sure if she should sing or not (of course, she should.)
Then, once that was finished, Elizabeth led the class through a review of what we studied last session. Also, she brought cookies! In honor of the last day of Excel. Since we’re working on an Excel Game, which can be really, really complicated, (but also really, really fun) there were A LOT of fires to put out. Add in the network problems we were having (dropped connections, no available connections, etc.) and everything was slow-going, but the students did a great job of rolling with the punches and getting everything done. There were some really interesting issues, such as naming the right columns the right thing, and remembering to SAVE OFTEN, and everyone did a great job of helping each other out. Since Elizabeth and Paul had their hands full, team effort was really important to make sure everybody got to where they needed to be!
Eventually, and with a lot of hard work, most of the class got to where they needed to be. The game was played, and many battles were fought and lost. Keke and Jose came out winners, as did Tenzin and Jaylah. More importantly, it was a blast seeing the culmination of everyone’s hard work. Way to go, team!
Sunday, October 31, 2010
Understanding Exposure Settings on DSLR's

During the choice session on October 23rd, Felipe, with Chris and Tenzin K. supporting, taught students about the basics of exposure on Digital SLR Canon Powershot Cameras.
The first period started off with a brief introduction with a mini-ice breaker.
Following that, the instructors had the students take a quiz on Learn@UW about proper camera handling. The students were required to read a couple of paragraphs detailing the information and then had to answer six questions about what they read. If they did not achieve 100%, they had to take the test again or explain to an instructor the particular question they got wrong so that the instructors could see if the student understood the information.
After the quiz was done, the really fun stuff started! Felipe talked about the basics of exposure, emphasizing the components of the Exposure Triangle, and how the three aspects--aperture, shutter speed, and ISO--must be used in unison to obtain a correctly-exposed picture.
After going over the information, cameras were handed out. Each student got their own Canon PowerShot camera to experiment with. Felipe talked about proper handling, how the case must be sitting on a flat, sturdy surface before you unzip it and take the camera out so the camera doesn't fall to the ground.

Felipe talked about the M, Av, Tv, and P modes on the camera, what each one does, what you can control, etc. The students then went on a 10 minute break.

Once at the ramp, Felipe decided that the class would start by taking pictures above the entrance, on the ledge with the plants next to the big windows. Because of the open ledge, the stairs, the hallways, and different things around the area, students got creative with their points of view and perspectives. They also had each other as subjects as well as some plants and the stuffed animals.

Inside, some of the students seemed to particularly enjoy taking pictures of the stuffed animals from unique perspectives, like from below, putting the stuffed animal on top of the entrance and taking a picture from the ground underneath. Anny and Leroy got on the same level of the stuffed animals, laying down flat on the ground to get pictures that way. Briana took some pictures with very unique perspectives, like laying the camera against the wall facing up, or putting one of the stuffed animals on the stairs and shooting it from the bottom of the stairs.
The students had a very positive reaction to the choice session. A lot of them went as far as posting some of the images they took to their personal Facebook pages!
Following are some images taken during the sessions showing the students working.


~written 10/23/2010
Saturday, October 30, 2010
America's Next Top Blogger
What better way to start off the 2010-2011 choice sessions than to become a better blogger at Information Technology Academy? This must have been the thought of the four students who signed up for the blogger workshop, right? :D At least, that's what I like to believe. But that doesn't matter because no matter how small an interest in blogging is, it will go a long way... through ITA and beyond.
As a graduate of ITA (2009), I didn't get as much of a chance, if at all to write blogs while I was in ITA (to be frank, I don't recall when AJ, the lead technology instructor, implemented or discovered blogging), but better yet, I don't just get to write blogs, I get the honor of teaching how to write blogs too!
The goal of the course was designed to make students more aware of their writing style and the way that they present it to the their readers. As you're reading this, you're probably thinking, "Wow, she's a good writer. I want to keep reading," right? I'm just playing! But please... do.. keep reading because it's all about how the workshop went.
The students started off the day with a writing a blog about what "blogging at ITA" means to them... Students wrote that it meant telling instructors how their projects went for the day. And at least in some part, it is to inform instructors on how the day went. Blogs are also useful for the students! When they return from a long break, they can read their posts and remember what they did at the last session they attended. They can also do a better job analyzing what they have learned and how they have grown while in the IT Academy program.
After a discussion on how everyone can utilize blogging at ITA, the class jumped right into "good" blogs on the internet. A lot of the good/more intriguing blogs, as the students pointed out, had a lot of pictures which kept the reader's attention among other things.
After looking at examples of good blogs, the class critiqued each others' previous blog posts. This led to a revision of their blog posts; a nice way to finish the workshop!
~written on 10/23/2010
UPDATE: Starting this year, at IT Academy's 11th Annual Holiday Luncheon event, we are now able to reward ITA's best blogger! It's called the "Blog Maven Award," and the prize this year was a "smart pen" which is a great tool for writing, drawing, taking notes, and using a computer. Congratulations to Kim!!!
Friday, October 29, 2010
Audacity Choice Session!
October 23rd was the first of ITA's new Choice Sessions, wherein the students were put into classes based on selections they made at the beginning of the school year.
I, Paul, taught a class on Audacity, and it was a lot of fun.
In my morning session, the students did very well in getting Audacity up and running on their machines, downloading being an important part of the class since Audacity is free, open-source software, which anyone can download here.
Once the students had everything installed (including the LAME plugin for .mp3 exporting) we listened to some conceptual sound projects, including a nine-person clap performance, written by minimalist Steve Reich, and a Pierre Schaeffer piece from 1948.
Some of the pieces were a little esoteric - more sound than music pieces, but the students got into them just fine, and had some interesting comments about the usage of sound and the messages conveyed.
After that, they were let loose on Audacity, using it to create their own projects, based on sound FX provided to them or anything they could find on www.freesound.org, an internet database full of free sound effects.
Audacity is a great program for just picking up and using, once you get over the inherent plainness of the UI (user interface), and I was surprised by how little help the students needed once they got into the real meat of the assignment.
Different students put together some fun stuff, and everyone asked some great questions about the tools and interface. The afternoon class had some technical issues, at least more than the morning class, which was unexpected. But, that didn't mean that no one got to work! Clara put together a really interesting piece, and Dylan came up with a great concept of background, sci-fi sort of soundscapes.
Take a listen for yourself to some of the students' creations!
~written on 10/23/2010
Thursday, October 28, 2010
Glimpse into College (Virtually): Techy Perks
ITA, as a college preparatory program, offers opportunity after opportunity for students to gain skills that will allow them to succeed in the college environment. Often, though, it is still difficult to get a picture of what being a college student would actually be like. So, for our first choice weekend, I (Elizabeth) designed a session entitled Techy College Kid Perks. The class was meant to give students a new view of college student life from the lens of what resources will be available to them when they begin their journey as college freshmen!


We had a nice sized intimate group with 5 students - two of whom were dressed for the occasion! (Marylin Monroe and the Queen of Hearts - this was the ITA weekend right before Halloween) Sitting around a table together, we began to go through the many resources available to UW Madison students. There was a lot of interest! Students surfed on NAXOS, an online music library that we have free access to through the university at the Mills Music Library Website. To make it interesting, one student in particular would type in random syllables and see what music came up! We had some fun selections - from African drums, to Asian strings. Continuing with music, everyone seemed very interested in the music school calendar; they did not know before that the university has so many cool free concerts going on all the time! There is also the option of listening to some of them online.
The next resource that elicited a lot of excitement was the university timetable. It is the complete listing of all classes happening in a given semester, including location and time. The students were very excited to discover they could actually take a tour and go to college courses before they had graduated from high school! I encouraged them to do so!
Speaking of classes, we also talked about how to find and register for classes. Long gone are the days of my mother's college experience, in which she had to run across campus to different departments to register for classes - now everything is completely done online. This is, however, always a very confusing process for new students at a university; hopefully now this group will feel more confident when it comes their turn! The campus map also came in very handy as I shared with them some of my favorite study spots around campus and described where certain buildings are.
Our end of class project was that each student should choose a library on campus - there are almost 50 of them - to research. In our class, we got to look at the Special Collections library within Memorial Library, the Social Science Library, the Geography Library, the Primate Research Center, and the Chemistry Library. Each student prepared a little presentation in PowerPoint on the library they had chosen. It was enjoyable to hear about each library and especially why each student chose that library. Here are some images from Natalie's presentation:


Overall, I was pleasantly surprised by how interested the students were in learning more about college and preparing themselves well now. And the students left feeling better equipped for the college experience and well informed about ways they can utilize college technology resources now, even while still in high school! And, the resources covered here are only a tiny slice of what's out there!
Wednesday, October 27, 2010
Film Beginnings: Viewing "Nosferatu"
Film Beginnings was a Choice Session where I, Tony Sanchez, go over the humble beginnings of film-making. We go over significant advances in film-making technology from the late 1800s to the early 1900s. Students get to watch clips of mostly short silent films, like the first video below, and some early "talkies," like the second video below. Hollywood and movie theater history were also addressed in Film Beginnings.
The students got the chance to view a film from the era which they've learned about, the 1922 horror classic, Nosferatu. This film fits in perfectly for this choice session at the end of October, because it is the very first incarnation of Dracula in a motion picture, ever. And, it's a silent film from the 1920's!
Halloween. Nosferatu. Silent films. Two classes... It was a good Saturday!
 After watching the film, we had discussions that spanned a bunch of topics. We tackled questions such as, why would this be a scary film for the time? What has changed since this film was made, and what seems to be the same in Hollywood? And, students finished off the day with writing a blog entry about what they learned and what they make of all this.
We all talked about how we like to watch this type of film, but that it certainly can bring about sleepiness. We felt it too bad that our current culture is all about fast-moving films that focus more on special FX rather than straight-up acting talent. It was also pointed out that most of us only encounter older films in the classroom, rather than at home, or in the theaters.
Morning Highlights:
The Film Beginnings Saturday double-header started out with the sleepy freshmen and juniors. Though groggy and silent, they showed that they were interested by being attentive. They also asked great questions during the lecture.
Nosferatu racked up half the class, but was worth every minute. The post-screening discussion was riveting. There was a mixed response to the film, but in the end, students appreciated its importance. Carrie brought up Nosferatu's ears, Jon made good observations about some of the effects and techniques that were used in the film. Everyone was riffing off each other and holding an intriguing discussion. Arissa was the only one who dozed off for a few minutes during the film.
Afternoon Highlights:
The sophomores and seniors were in class the second half of the day. Their attentiveness during lecture was not as high as the morning class, but they were picking up on most of the same points (similar questions on similar material).
Nosferatu was widely accepted by the students, but they were more on the negative side. I heard Thuy Dan say "wow, that was a LONG movie!" but really it was only an hour and a half long... There were a bunch of late arrivals today, due to many Seniors taking the ACT in the morning, but the discussion went pretty well. In the afternoon, we had two dozers, but everyone got the point of the movie.
-Tony Sanchez
PS - If you have a netflix account, you can stream a version of Nosferatu to watch for yourself!
PS - If you have a netflix account, you can stream a version of Nosferatu to watch for yourself!
Tuesday, October 26, 2010
The Skype Protocol
Dear Reader:
On October 23rd, two classrooms of select ITA students learned the basics of Skype, a multi-faceted piece of software capable of connecting people in tons of ways! Our students learned how to screen share, text, chat, play games, voice chat, video chat, change avatars, invite friends, download the client, and call phones, all using the Skype software and protocol.
They also learned the background to the internet -- how bits are transferred, how to use "speedtest.net" to see your how fast your internet connection uploads and downloads, examples of the different applications (e.g. Skype and WWW).
The afternoon group also learned about "Yuuguu", a collaboration tool that allows multiple screens (unlike Skype) to view a single shared screen. Collin showed a youtube video recorded at lunch of a Barack Obama halloween costume. Illa was so amazed, he took out his iPhone and recorded a video of the screen sharing of the video that was recorded at lunch. He also was unimpressed when someone pointed out the video could have just been forwarded as a link, and the screen sharing business avoided altogether. But, I think we all get the point :)
Skype was quite fun at times: everyone calling each other from across the room, having to end calls to accept others, starting group chats with the whole room, reeling from the microphone feedback. The morning group especially took a very hands on approach; instead of asking "how do I do this?" they looked almost everything up themselves -- from configuring their microphones to how many bits are in ASCII code.
All in all, the Sky Protocol was a nerdy success!
Monday, October 25, 2010
Google Earth... Moon, Mars, and Stars
The day started out rainy, I think the majority of Saturdays for ITA classes has been rainy, windy or cloudy. But that doesn’t stop the ITA students from attending classes. Today was a treat for the students since they had the option of choosing a class they were interested in. The classes ITA offered were Exposure, Skype, Audacity, Google Earth (mine), "Techy Kollege Kid Perks," Film Beginnings, and "America's Next Best Blogger."


The students came in like gang busters as usual ready to learn and try new adventures in the computer world hosted by ITA. I had a few lost souls in my class that should have been in another class but we ironed out the wrinkles and we were on course and engaged in our studies on time.

I had two classes for my Google Earth lesson; one in the morning and one in the afternoon with approximately ten students in each. I started off by introducing the students to what the Google Earth program is and how it receives the information we see from the satellites around our planet.
After pointing out the location of the tools, the “place” window, the "layers” window and the “3D viewer” screen, we took an auto-tour of the world provided by Google Earth. Afterwards, I asked the students to see if they could find their house and some of them did find their house, while others were interested in finding a place they moved from. Some other students then started to find where they were born.
I presented the students with Google Earth’s “place” window again and instructed them on how to create a folder in the “place” window and how to create place markers to any place on the globe in Google Earth. Then, students were to add at least five place markers into the folder. These marked places could have been places they would like to visit or places they were interested in.


After all the formal instructions were over, the students were allowed to go anywhere in the world they wanted to go in Google Earth and to try out some of the tools, layers and options available to them in the program.
The students clearly enjoyed this session. Once I set them free, they sure went to diverse places... While some stayed on earth and went exploring the globe, some went to the moon, some went to Mars, and others still were looking at the stars. Did you know that you can just keep zooming deeper and deeper into space!? In the end of each class, morning and afternoon, we all had come back to earth in Madison, Wisconsin then to the Computer Science building.

I’m not sure if the students felt the same way I did after I walked out of the building but it felt a little odd walking on the ground since a few minutes before I could be in Japan in less than a minute in Google Earth. Now, it was going to take me 20 minutes just to walk to my apartment in Madison!
Saturday, October 23, 2010
First CHOICE SESSION Lab!
On October 23rd, 2010, students in the ITA technology labs were placed in classrooms based on their specific interests for the first time ever!
At the start of the semester, all the instructors created half-day workshops focused on different types of technology. These included the following:
In the entries that follow this post, you can read about how each workshop went, and view some of the classroom materials and student projects!
At the start of the semester, all the instructors created half-day workshops focused on different types of technology. These included the following:
- Understanding Exposure on DSLR Cameras
- America's Next Best Blogger
- Audacity, Open-Source Audio Editing
- Techy Perks of being a College Student
- Film Beginnings
- Skype and Voice Over IP
- Google Earth
In the entries that follow this post, you can read about how each workshop went, and view some of the classroom materials and student projects!
Video Games and Scratch: Day 2
Hi, Paul here again :)
Today began with a quick review of the concepts discussed on the first day, with students talking once again about game mechanics and dynamics. Terrence was right up front, quickly explaining what dynamics were.
Next, we talked about the games they played last time, and what was fun and what wasn't. Jasmine had played Rock Band, and had a lot more fun than she had initially expected, rockin' out to the music with the best of them!
It was great to see high school students critically thinking about video game play and why video games involve so much thought from the developers, and so many different intelligences from the players.
The review complete, the first exercise was to find a game review online and read it closely, paying attention to how the reviewers talked about the game and how it fit in with the topics we had discussed. Each student took notes on the review and then stood before the class in turn, presenting their review and talking about what they liked and what confused them. Some good points were raised, including the role of the ESRB and how it fits into the gaming industry.
Finally, the students downloaded Scratch, a free open source software developed by students at MIT to teach about programming, onto their computers and checked out the games available at MIT's website. RocketMan was very popular, and they were able to download it and take a look at how it is set up in Scratch. Hopefully, it'll give them some insight into making games with Scratch, which they'll be doing next session!
~written on 9/25/2010
Video Games and Scratch: Day 1
Today was the first day back at ITA, and we jumped in with both feet with the Video Games in Scratch custom workshop. We took the students over to the video game lab in the UW-Teacher Education building so they could get the full experience.
Ryan started them off with a short lecture about concepts behind video game design, starting with Game Mechanics, Dynamics, and Aesthetics.
The students were a little uncertain about talking about video games in such terms, but it wasn't long before they started to get into the discussion. Jacob raised some good points about why some games were more appealing than others, citing things like storyline and challenge, and Saige told everyone about her challenges playing Super Mario Kart against her brother.
Next, Ryan showed them the game Braid, and everyone had a great time playing that on the projector so the others could watch. Terrence did a great job navigating the difficult terrain. Way to go, Terrence!
Finally, the students were split up so they could play whatever game they chose form the lab's wide-ranging stock, with the intent that they pay attention to the things we had discussed. With things like mechanics and dynamics in mind, they played Rock Band, Call of Duty, and the Orange Box, enjoying themselves immensely, while learning something at the same time.
All in all, a great day for ITA!!!
~written on 9/11/2010
Friday, October 22, 2010
Photoshop Actions and Scripts
For the first 3 sessions of IT Academy Labs, this fall, we offered several CUSTOM WORKSHOPS designed by individual instructors on staff. Chris Spears, one of our seasoned Photoshop experts, offered a workshop entitled, Photoshop Actions and Scripts.
Photoshop Actions and Scripts was a workshop all about increasing project productivity in Photoshop. Actions and scripts are very useful, but are very commonly and easily overlooked. They make the most tedious job, the most simple to-do in a matter of seconds, and you have the option to use ones provided, create your own, or download ones that other people have created!
The first session served mostly as an introduction to the concept and functionality of actions and scripts. The second session was centered a bit more around actions. And, the third and final session was all about using both actions and scripts together in different projects.

Being the first time ITA had offered the Custom Workshops, Session 1 of Photoshop Actions and Scripts had started off a bit slow. As stated above, this was an introductory session which served primarily as the introduction of the concepts behind actions and scripts as tools used for increasing project productivity so it was not very project oriented. It was more of a chance for students to get familiar with learning how to use and incorporate these two aspects of Photoshop in different kinds of projects. This included:
- creating and recording steps
- saving actions
- reading scripts and reading through action steps
- downloading scripts and actions from trusted sites
Nonetheless, the students seemed to be really amazed at how the actions and scripts were carried out and how much they could accomplish in such a short amount of time once they were ran.
By the end of the session the students had a couple of different projects they finished; one project was from a batch rename script, which re-names all your files for you using a systematic approach. One was from an action they downloaded from the internet and loaded into Photoshop (these varied), and their last one was from an action they created/recorded themselves (these also varied).
Check out some of the student examples!


First, we started off with a quick review from last session just about the main purpose of actions and scripts and their many uses. Then, we jumped right into the first project which was "Reading" actions--this project consisted of downloading an action of a cool effect from the internet (http://www.turningturnip.co.uk/photoshop/photoshop-actions/photo-box-action.php), loading it into Photoshop, viewing its contents and recorded steps, and then finally attempting to re-create the cool effect using the action as a step-by-step guided tutorial. While this was a bit tedious, it provided a great way to REALLY understand how these things work!
The purpose of this project was to get students more familiar with the process and order at which actions may be recorded, and also to get more familiar with the Photoshop interface and different tools and such, as they encountered many new terms for different Photoshop tools and processes through reading the recorded steps of the action. Unfortunately, the lead instructor, Chris, didn't notice that this particular action in order to achieve this cool effect was entirely TOOOO long to "read" in its entirety. So about a third of the way through reading the action, Chris decided to just stop and had the class hit the "play" button to finish it up... it was well worth the wait though, as the students got to delve deep into the script for a while, and then they were very relieved to be able to stop early.
Next, the students created their own actions which they saved to their folders for other students to load up and attempt to "read" themselves to see if they could get the same effects (although most of them probably just hit the "play" button to speed up the process...which is what the workshop was all about anyways so the students clearly grasped that concept quite nicely).

The final session began with a review in the form of a walk-through project called "Clipping Mask Collage." The students really enjoyed this project and were very satisfied with their results. This, again, was a way to give the students a bit more experience with creating longer actions and getting a better feel for the idea that not all steps that one may take to create a project in Photoshop can be recorded with actions (such as the Brush Tool), and also that sometimes there needs to be a specific order to how you record your actions in order for them to give the same effect when you run them again on another image.
Check out the examples!


For the remainder of the session the students created their own projects using different actions and scripts (custom, default, and/or downloaded). Here are some examples of their independent Photoshop Actions and Scripts projects from Session 3!
Wednesday, October 20, 2010
Slide Me To Vietnam
With the IT Academy's new curriculum in high motion, the students were divided up into classrooms for three and five session custom mini-course workshops. For the "Slide Me To Vietnam" workshop, the end product was a highlight video for the non-profit organization, the University of Wisconsin-Madison's Vietnam Health Project.
Ten students enrolled in this workshop and they each had their own section to the movie. Using iMovie on Macs, they sorted through 12GB's worth of pictures, animated a slideshow, and recorded their voices to tell the story.
 Session 1 was sweet and simple. During the morning survey, the lead instructor Ann asked the students what exactly is a landfill community? They had a vague interpretation to the extent of "people that live in a landfill." By the end of the three hours, the students understood that these families live and work on the landfill. They sort through garbage for 12 hours a day while earning only 7 dollars for the day, and their children cannot attend public schools, as their parents never had the access to acquire birth certificates for them. By the end of the session, the students developed sympathy to help these families and could not wait until next session to begin their portion of the video.
Session 2 started with an introduction to iMovie. iMovie is a program we've never had a chance to teach at ITA. The students' energy drained as they sorted through hundreds of pictures. When they needed to record their voice-over, the fatigue echoed through their voices.
The students temporarily lost the sense of teamwork and instead of working together to make sure the video contained consistent transitions and text, they went on with their own creativity. The hectic rush at the end of the day to upload to YouTube the preliminary draft, made the environment even more stressful. At the end of the day the students anxiously wanted to leave, but before they left Ann asked them why they were doing this project. Ashanti simply replied "to help those children." Suddenly the purpose behind the project became the focal point, which showed as we shifted gears in the third, and final, day of the workshop...
Here is one student's draft from the end of day two:
Session 3 came two weeks later and the students knew they HAD to finish the video. Before they began to work, Ann distributed Thank You cards created by the children of the landfill community. Even though they lived over five thousand miles away, at that moment the distance did not seem so far. As a class, the students did a peer critique of each draft. They understood that consistency was the key to allow the videos to piece together and forced each other to perfect their section. In only forty minutes, they finished. The students rendered their final product and Ann pieced together the video simply by clicking and dragging. Watching the video as a class, the students were proud of their new creation that would be donated to the organization.
And now, you can view the product of all the hard work and effort to make the following video slide show:
Ten students enrolled in this workshop and they each had their own section to the movie. Using iMovie on Macs, they sorted through 12GB's worth of pictures, animated a slideshow, and recorded their voices to tell the story.
 Session 1 was sweet and simple. During the morning survey, the lead instructor Ann asked the students what exactly is a landfill community? They had a vague interpretation to the extent of "people that live in a landfill." By the end of the three hours, the students understood that these families live and work on the landfill. They sort through garbage for 12 hours a day while earning only 7 dollars for the day, and their children cannot attend public schools, as their parents never had the access to acquire birth certificates for them. By the end of the session, the students developed sympathy to help these families and could not wait until next session to begin their portion of the video.
 Session 2 started with an introduction to iMovie. iMovie is a program we've never had a chance to teach at ITA. The students' energy drained as they sorted through hundreds of pictures. When they needed to record their voice-over, the fatigue echoed through their voices.
The students temporarily lost the sense of teamwork and instead of working together to make sure the video contained consistent transitions and text, they went on with their own creativity. The hectic rush at the end of the day to upload to YouTube the preliminary draft, made the environment even more stressful. At the end of the day the students anxiously wanted to leave, but before they left Ann asked them why they were doing this project. Ashanti simply replied "to help those children." Suddenly the purpose behind the project became the focal point, which showed as we shifted gears in the third, and final, day of the workshop...
Here is one student's draft from the end of day two:
Session 3 came two weeks later and the students knew they HAD to finish the video. Before they began to work, Ann distributed Thank You cards created by the children of the landfill community. Even though they lived over five thousand miles away, at that moment the distance did not seem so far. As a class, the students did a peer critique of each draft. They understood that consistency was the key to allow the videos to piece together and forced each other to perfect their section. In only forty minutes, they finished. The students rendered their final product and Ann pieced together the video simply by clicking and dragging. Watching the video as a class, the students were proud of their new creation that would be donated to the organization.
And now, you can view the product of all the hard work and effort to make the following video slide show:
Friday, October 15, 2010
Real and Digital Art: ITA Students Have "Mad Art Skills"!
We started our first session with me (Eliza) showing my artwork and sharing with the students my system for creating it:
I find a digital image, print the image, and then transfer it onto an art board. From there, I paint on it with acrylic paints and then create additional layers by adding collage. I have also been taking photos of the paintings and then continuing to work on the image within Illustrator. Then I print the Illustrator artwork, collage it on to the painting, and continue the process until I am satisfied with the results. Because this process involves both real-space artwork and virtual-space artwork, I have a series of digital images as well as the final painting.


On the third day, we began with a quick and very effective lesson by Cristina on how to connect to an ITA network drive, where students could access, store, and share their work. Then, we spent the rest of the day working on our artwork. The students have all created some FANTASTIC pieces:


Jeremy used Photoshop and added construction paper collage to create a very amusing character:


I find a digital image, print the image, and then transfer it onto an art board. From there, I paint on it with acrylic paints and then create additional layers by adding collage. I have also been taking photos of the paintings and then continuing to work on the image within Illustrator. Then I print the Illustrator artwork, collage it on to the painting, and continue the process until I am satisfied with the results. Because this process involves both real-space artwork and virtual-space artwork, I have a series of digital images as well as the final painting.

Saint Lucy, by Eliza
For the workshop, I selected a collection of interesting photographs from Shorpy.com. The students could either draw and collage directly on the printed black and white photos, or download the image file and begin altering the image digitally. Then they could print their images, take photos of them, and continue the process using collage.
The first day, students seemed to get a slow start, and on the second day they got going right away and they made rapid progress!
Natalia used the collage technique on a digital image of a child in a forest. It has a fairy tale feel to it.
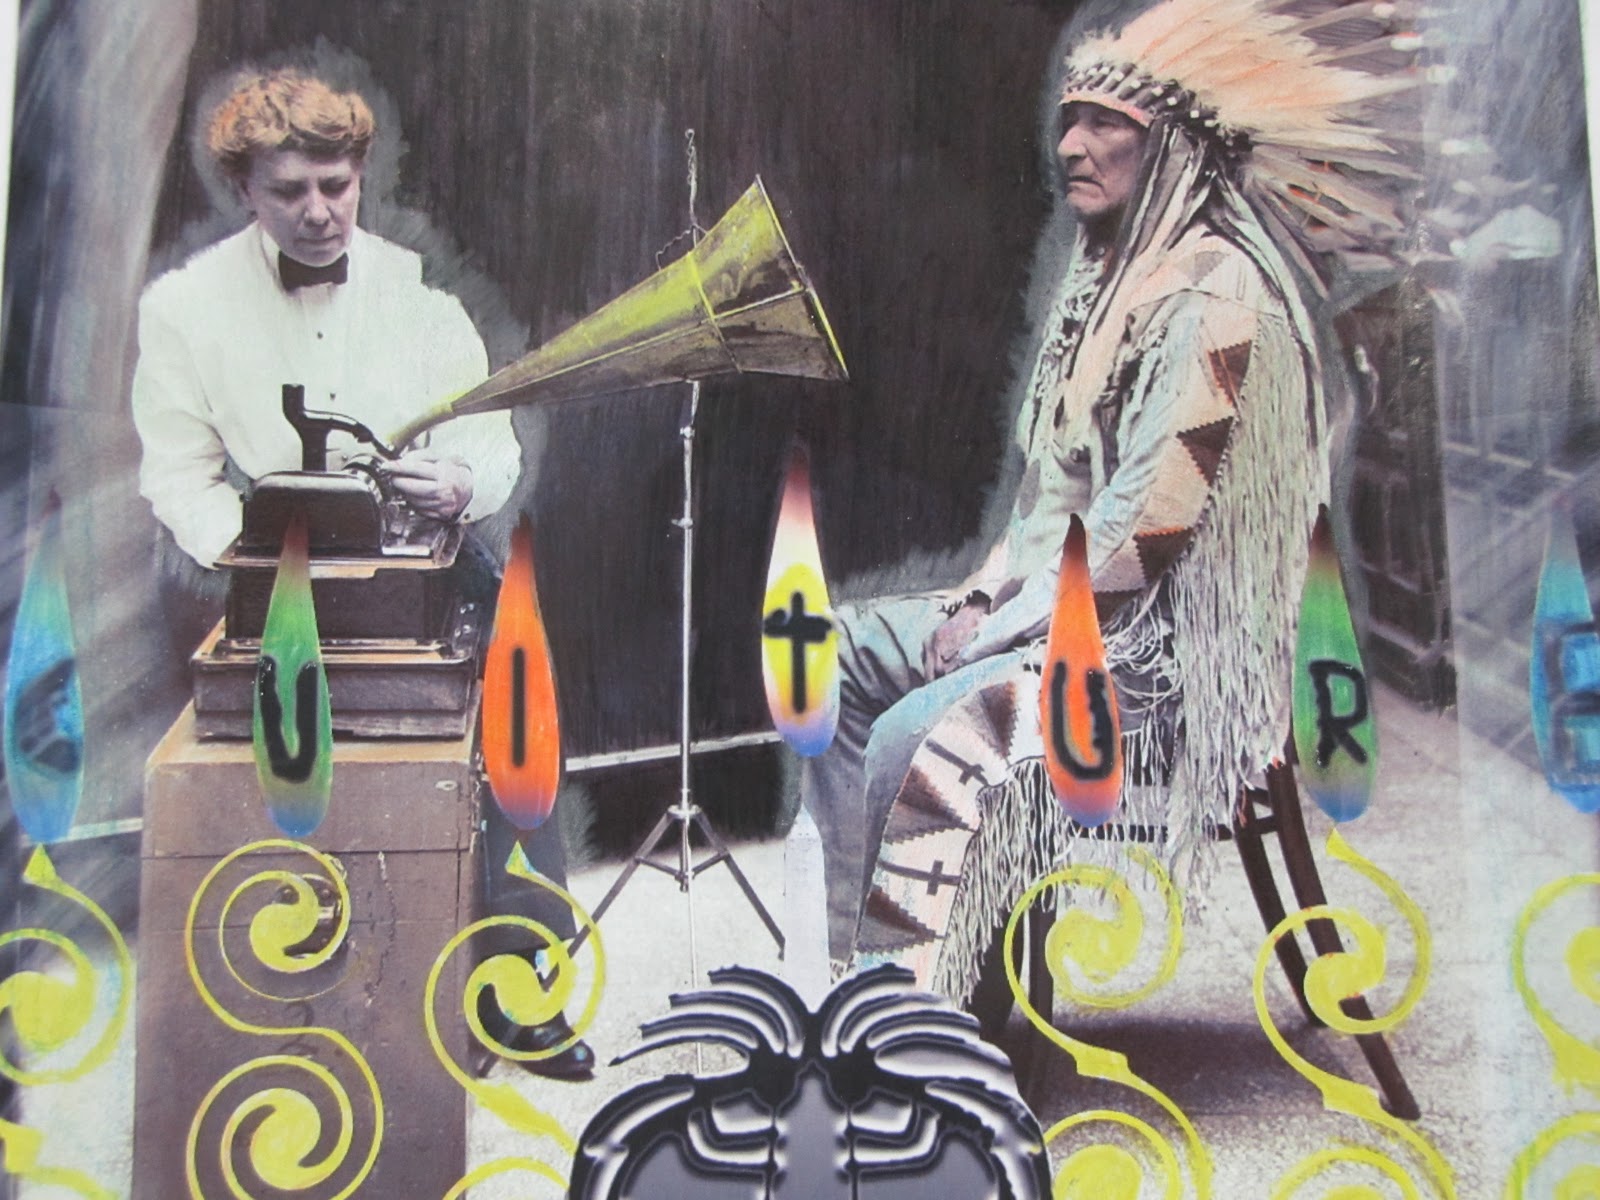
Jose worked on adding images to a old photo of a woman taking dictation from a Native American chief.
Patrick spent the second day working on an image of a lion. He was swirling out the edges of the lion's body which was giving it an otherworldly quality.
Aubrey was altering a picture of some strange-looking old-fashioned circus people. He added color and pasted some industrial buildings into the skyline.
Tenzin's boxing guys were turning into superheroes and he was planning on adding some effects to make them look like cartoons from the 50s or 60s.
Leija was combining several different photos, including photos of his friends, to make vampire creatures.
Kim brought some of her own drawings, which she had photographed and wanted to try working with in Adobe Illustrator.
Jeremy's artwork was based on an old photo of a smiling small person.
Eddie's piece shows thoughtful, careful work. He printed out a picture of a kindergarten classroom after the Chernobyl Disaster of 1986. He almost seamlessly transposed a photo of a child from the early 20th Century onto it. He worked really hard to cut out that image of the child and he pasted it on so that it looks like the child is holding the bar of one of the cribs.
Natalia used the collage technique on a digital image of a child in a forest. It has a fairy tale feel to it.
Jose worked on adding images to a old photo of a woman taking dictation from a Native American chief.
Patrick spent the second day working on an image of a lion. He was swirling out the edges of the lion's body which was giving it an otherworldly quality.
Aubrey was altering a picture of some strange-looking old-fashioned circus people. He added color and pasted some industrial buildings into the skyline.
Tenzin's boxing guys were turning into superheroes and he was planning on adding some effects to make them look like cartoons from the 50s or 60s.
Leija was combining several different photos, including photos of his friends, to make vampire creatures.
Kim brought some of her own drawings, which she had photographed and wanted to try working with in Adobe Illustrator.
Jeremy's artwork was based on an old photo of a smiling small person.
Eddie's piece shows thoughtful, careful work. He printed out a picture of a kindergarten classroom after the Chernobyl Disaster of 1986. He almost seamlessly transposed a photo of a child from the early 20th Century onto it. He worked really hard to cut out that image of the child and he pasted it on so that it looks like the child is holding the bar of one of the cribs.

Aubrey's image is impressive too. He added smokestacks and pollution and then colored his whole image to look like a smoggy day.

At the end of the second day, all the students were coming up with very interesting work, and I was really looking forward to watching the images evolve during the third session and to seeing the final results.
On the third day, we began with a quick and very effective lesson by Cristina on how to connect to an ITA network drive, where students could access, store, and share their work. Then, we spent the rest of the day working on our artwork. The students have all created some FANTASTIC pieces:
Kim had scanned in some of her own artwork at home, then she added a background in Adobe Photoshop and created an interesting cherry blossom design for her figure's clothing.

Kim's Cherry Blossom Kimono Picture

During the second week of class, Patrick unfortunately lost his first lion picture; he had not been saving his work and there was a problem with his computer, so after he rebooted, he was unable to retrieve his really great work. But, he did not let that stop him! He learned from the experience (he was saving constantly while working on his second picture!) and he created ANOTHER AWESOME one, done mostly in Photoshop. He added wings to the lion, and then put the whole figure into a completely different background. I really like the arc of light on the right. Very effective image and fantastic learning experience--way to go Patrick!!
Natalia's Child in the Woods is really fabulous too:

This is not her final product, though, because she has been adding some cut-out collage that really creates some interesting effects . . . those woods have eyes!
Juan finished his image of the Chief and then added some coloring effects on the final product. He used colored pencils on a print out, which he blended with his fingers. This made the surface smooth and glossy, adding an interesting dimension to the picture. After that, he scanned in his entire final product:
Jeremy used Photoshop and added construction paper collage to create a very amusing character:

Tenzin finished his image of two men boxing:

This custom workshop has been a success: everyone learned a lot, had some fun, tried something new, and made a project he or she can be proud of. As an instructor, I found it rewarding to share my own talents with the students and show them how technology can be part of our lives in an interesting and exciting way.
Subscribe to:
Posts (Atom)