Showing posts with label Photography. Show all posts

Wednesday, October 26, 2011

Exploring Aviary

Felipe Gacharna
- ITA Tech Instructor -

For the October 22nd ITA session, students had the option to join a choice session that explored Aviary. Aviary is a free online set of tools that allow for image editing and creation as well as music editing and creation. In particular, students got to explore the Phoenix photo editor, similar to Adobe Photoshop, the Raven vector editor, similar to Adobe Illustrator, the Myna music creator, similar to Sony ACID, and the Peacock effects editor, which is unlike most programs the students have experienced before in ITA.

All the Aviary software runs in a browser and is free for anyone to use! We used the specialized education version to great success, which allowed us to oversee much of what the students were able to accomplish in this session.

This student was very proud of the work she could do to her photo in a web browser software:


Phoenix (like Photoshop)


Phoenix has many of the same features that students have already learned in Photoshop, including layers, blending modes, filters, and the clone stamp tool, to name a few. In Phoenix, students got to play around with a base image of a hot air balloon that I provided.

Using the hot air balloon image, students were able to duplicate some of the functionality they are familiar with in Photoshop and then take it to another level with the Peacock effects editor.

Peacock (a unique photo editing tool)

You can "push" a layer from Phoenix directly to Peacock, edit the layer in Peacock, and then send it back to Phoenix. Here are some pictures of the edited hot air balloon image as well as a screen shot of the Peacock editor, showing the unique user interface.


These edited balloon images showcase some of what you can do with Phoenix and Peacock.


This screenshot of Peacock shows the "node-based user interface" that the tool uses. It's a rather unique user interface (UI) where the user is provided with "nodes" or blocks which they can manipulate. Nodes can be connected through the little "notches" on the top and on the bottom of each. These "notches" are inputs and outputs. Manipulating the inputs and outputs to each node allows for heavy manipulation of images, and since each node has its own properties that can also be manipulated, the user has a lot of power in creating a desired effect.

Here's another screenshot of Peacock showing the nodes more clearly and some manipulation done to a gradient.


Myna (sort of like Sony ACID or a drum machine)

The Myna music creator allowed students to mix sounds from a large library to create beats. Myna provides a simple interface, with several layers of different sounds and each sound having a track, with beats being on or off for a given beat. Volume can be tuned for each sound as well as for each particular beat, so students have a good amount of power in mixing their beats. Here is a screenshot of one of the beats created by a student as well as an over-the-shoulder picture of one of the students working on his Myna project.


Listen to some beats the students made:


Aviary also provides a Hall of Fame where anyone can look through submissions, as ranked by users. Most of the time, the projects actually allow you to open up the program used to create it so that users can view how the project was created. Students had an opportunity to look through the Hall of Fame to see what could be done with the tools they were using and to help them gather ideas of how they could achieve some effects in their final artifacts by looking through the projects that allowed you to see how they were created.

Wednesday, August 3, 2011

Many Uses of Computers Camp 2011: Graphic Design or Photography?

Cristina Lor
- ITA Tech Instructor -

The second day of class was another great experience; were so into their Adobe Photoshop and Illustrator projects that they spent their break time working on them.

The said projects include their “Layers of Me” which was created in Photoshop. In this project, the students had to import their portrait into Photoshop and then add multiple layers, categorized in the folders named “Culture”, “Hobbies”, “Name” in which all text found in the folders related to each of the folder name. They had the chance to change the font size, color, family, effects, and location of each text box.

Their illustrator project revolved around family, but in the form of penguins! In this graphic design portion of the session, the students were to use premade symbols to assemble penguin versions of their family.

Here are some class examples:


During the third hour of labs, the Evaluation unit, the students were given a mini lesson on blogging – capitalize proper nouns such as, Adobe Illustrator and Photoshop, and utilizing the power of the Enter/Return key whenever a new thought is formed! Once the mini lesson was completed, the students dove into finishing up projects, catching up from the day before, or blogging.

Looking at how fast the students picked up on both of these programs illustrates how the instructors were getting more comfortable with the students, even after only two days!

Monday, January 24, 2011

Senioritis? Not With These ITA Seniors.


Almost half way through the class of 2011's last year at ITA, the seniors are showing no signs of lack of motivation, procrastination, drop in lab performance, or "coasting" through the afternoon. These symptoms more commonly known as senioritis fail to be observed at ITA with this year's excellent students. The students have already shared their proposals for their project at the Holiday Luncheon. For those of you who could not attend, here is a brief re-cap of what the seniors are doing.

Protein Tubar Video by Thor and Thuy Dan
Thor and Thuy Dan are working with Professor Dave Nelson from the department of biochemistry here on campus. They taped an instructional video of Professor Nelson using the Tubar Protein Modeling Kit for SMART teams at Madison West High School. SMART Teams stand for Students Modeling A Research Topic, an extra-curricular activity that introduces high school students to the field of biomolecular research. This video will be used for teachers in the program as a demo of how to use Tubar Kits.

Flash Animations by Eddie and Jeremy
Eddie and Jeremy are creating complex Flash Animations for Professor Sebastian Bednarek of the department of biochemistry. From the pictures on the side you can see their drawing progress thus far. Eddie is working on cell membrane trafficking (on the left) and Jeremy is working on clathrin mediated endocytosis (on the right).

Scientific Demos by Noah and Maya
Noah and Maya are taping scientific demos for the biochemistry course "Exploring the Biomolecular World" taught by Professors Dave Nelson and Michael Patrick. The two scientific demos that Noah and Maya will be filming is a short video on the hydrophobic effect and an experiemnt using Beta-Galactoside.

ITA Recap by Adrianne, Lakoye, and Jasmine
Adrianne, Lakoye, and Jasmine will be using iMovie to create short video presentations about past ITA projects. These projects will be displayed for recruitment and funding meetings to demonstrate the great work done at ITA.

Video Tape of the Crystallography Research Facility
Students will be working with one of the post graduate students working with Professor Katrina Forest. Professor Forest uses x-ray crystallography in her research to study the interactions between humans and microbes. our students' task will be to record a 45 minute video of the entire process.


Interviews of Campus Professors
Students will be venturing to different research laboratories on campus to interview professors about their work. The video's goal will be to inform undergraduate students about the various research on campus to help aid them in choosing which lab to join. The first professor the students will be interviewing is Douglas Weibel from the Department of Biochemistry.

Tutorial on Jmol by Leija and Ivan
Ivan and Leija will be using CamStudio to help record a tutorial of how to use Jmol, a protein modeling software program. They will be recording an expert in Jmol give an instructional lesson of how to use the program and then distribute this video to various science professors on campus.

Holiday Greeting Cards by Ashanti and Julie
Ashanti and Julie are using Adobe Photoshop to create custom-made greeting cards for the UW-Madison Children's Hospital. They will be printing out their designs and hand delivering them in the upcoming months.

ITA Digital Yearbook by Eileen and Kiran
Eileen and Kiran will be creating the second ITA digital yearbook. The yearbook will include fun facts about each ITA student and highlight the events from this past year. Currently, the two are in the process of taking the ITA student yearbook pictures and designing a new layout in Adobe InDesign.

Congratulations Seniors!!! Keep up the great work!

Sunday, December 12, 2010

Video Commercials -- Choice Session 2

On December 4th and 11th, one choice session was a unit on making video commercials, giving the students a chance to learn something about the art of advertisement. It was good to see that we had an almost 100% attendance, considering the weather, and everyone was bright-eyed and ready to get some video editing done!

We started with a brief primer on advertising concepts, with the students learning about brand recognition and the necessity of economy of information. Commercial makers don't have a lot of time to get their point across to an audience, especially due to cost to buy air time, so we really wanted to enforce a strict time limit on their projects. We followed the lesson with some examples of famous commercials, including the 1979 Mean Joe Greene Coca-Cola ad and the 1984 Macintosh commercial. We talked about the specific principles involved in each ad--what worked, what didn't, what kind of effect the commercial had, etc.

Here's the Coca-Cola ad:


And, the Mac ad:


With all of this information to arm them, the students launched into their projects. To leave enough time for the 11th Annual Holiday Luncheon, the morning session had twice as much time as the afternoon session did, so the afternoon session was really under the gun when it came to their work.

As a result, the morning session went a little higher on concept, with a lot of recording being done, but not a lot of editing. The afternoon session performed with flying colors, all three groups finishing their project by the end of the class. Yay for them! Impressive work!!

Here are the projects that the afternoon class completed:


Great work, everyone!

Sunday, October 31, 2010

Understanding Exposure Settings on DSLR's


During the choice session on October 23rd, Felipe, with Chris and Tenzin K. supporting, taught students about the basics of exposure on Digital SLR Canon Powershot Cameras.

The first period started off with a brief introduction with a mini-ice breaker.

Following that, the instructors had the students take a quiz on Learn@UW about proper camera handling. The students were required to read a couple of paragraphs detailing the information and then had to answer six questions about what they read. If they did not achieve 100%, they had to take the test again or explain to an instructor the particular question they got wrong so that the instructors could see if the student understood the information.

After the quiz was done, the really fun stuff started! Felipe talked about the basics of exposure, emphasizing the components of the Exposure Triangle, and how the three aspects--aperture, shutter speed, and ISO--must be used in unison to obtain a correctly-exposed picture.

After going over the information, cameras were handed out. Each student got their own Canon PowerShot camera to experiment with. Felipe talked about proper handling, how the case must be sitting on a flat, sturdy surface before you unzip it and take the camera out so the camera doesn't fall to the ground.

He showed them how to hold the camera, with the strap around their necks, hands on the grip and beneath the camera for support. The different cameras modes were then covered.

Felipe talked about the M, Av, Tv, and P modes on the camera, what each one does, what you can control, etc. The students then went on a 10 minute break.


After break, everyone grabbed their cameras, Felipe grabbed two stuffed animals he brought for subjects, and the class headed out to the entrance with the ramp facing Union South.

Once at the ramp, Felipe decided that the class would start by taking pictures above the entrance, on the ledge with the plants next to the big windows. Because of the open ledge, the stairs, the hallways, and different things around the area, students got creative with their points of view and perspectives. They also had each other as subjects as well as some plants and the stuffed animals.

It happened that there were some construction workers outside, so they also became the focus of some pictures. A few students asked to go outside, since it had stopped raining, and were able to take pictures outside for a little bit, with Chris.

Inside, some of the students seemed to particularly enjoy taking pictures of the stuffed animals from unique perspectives, like from below, putting the stuffed animal on top of the entrance and taking a picture from the ground underneath. Anny and Leroy got on the same level of the stuffed animals, laying down flat on the ground to get pictures that way. Briana took some pictures with very unique perspectives, like laying the camera against the wall facing up, or putting one of the stuffed animals on the stairs and shooting it from the bottom of the stairs.

The students had a very positive reaction to the choice session. A lot of them went as far as posting some of the images they took to their personal Facebook pages!
Following are some images taken during the sessions showing the students working.


~written 10/23/2010

Friday, October 15, 2010

Real and Digital Art: ITA Students Have "Mad Art Skills"!

We started our first session with me (Eliza) showing my artwork and sharing with the students my system for creating it:

I find a digital image, print the image, and then transfer it onto an art board. From there, I paint on it with acrylic paints and then create additional layers by adding collage. I have also been taking photos of the paintings and then continuing to work on the image within Illustrator. Then I print the Illustrator artwork, collage it on to the painting, and continue the process until I am satisfied with the results. Because this process involves both real-space artwork and virtual-space artwork, I have a series of digital images as well as the final painting.
Saint Lucy, by Eliza

For the workshop, I selected a collection of interesting photographs from Shorpy.com. The students could either draw and collage directly on the printed black and white photos, or download the image file and begin altering the image digitally. Then they could print their images, take photos of them, and continue the process using collage.

The first day, students seemed to get a slow start, and on the second day they got going right away and they made rapid progress!

Natalia used the collage technique on a digital image of a child in a forest. It has a fairy tale feel to it.

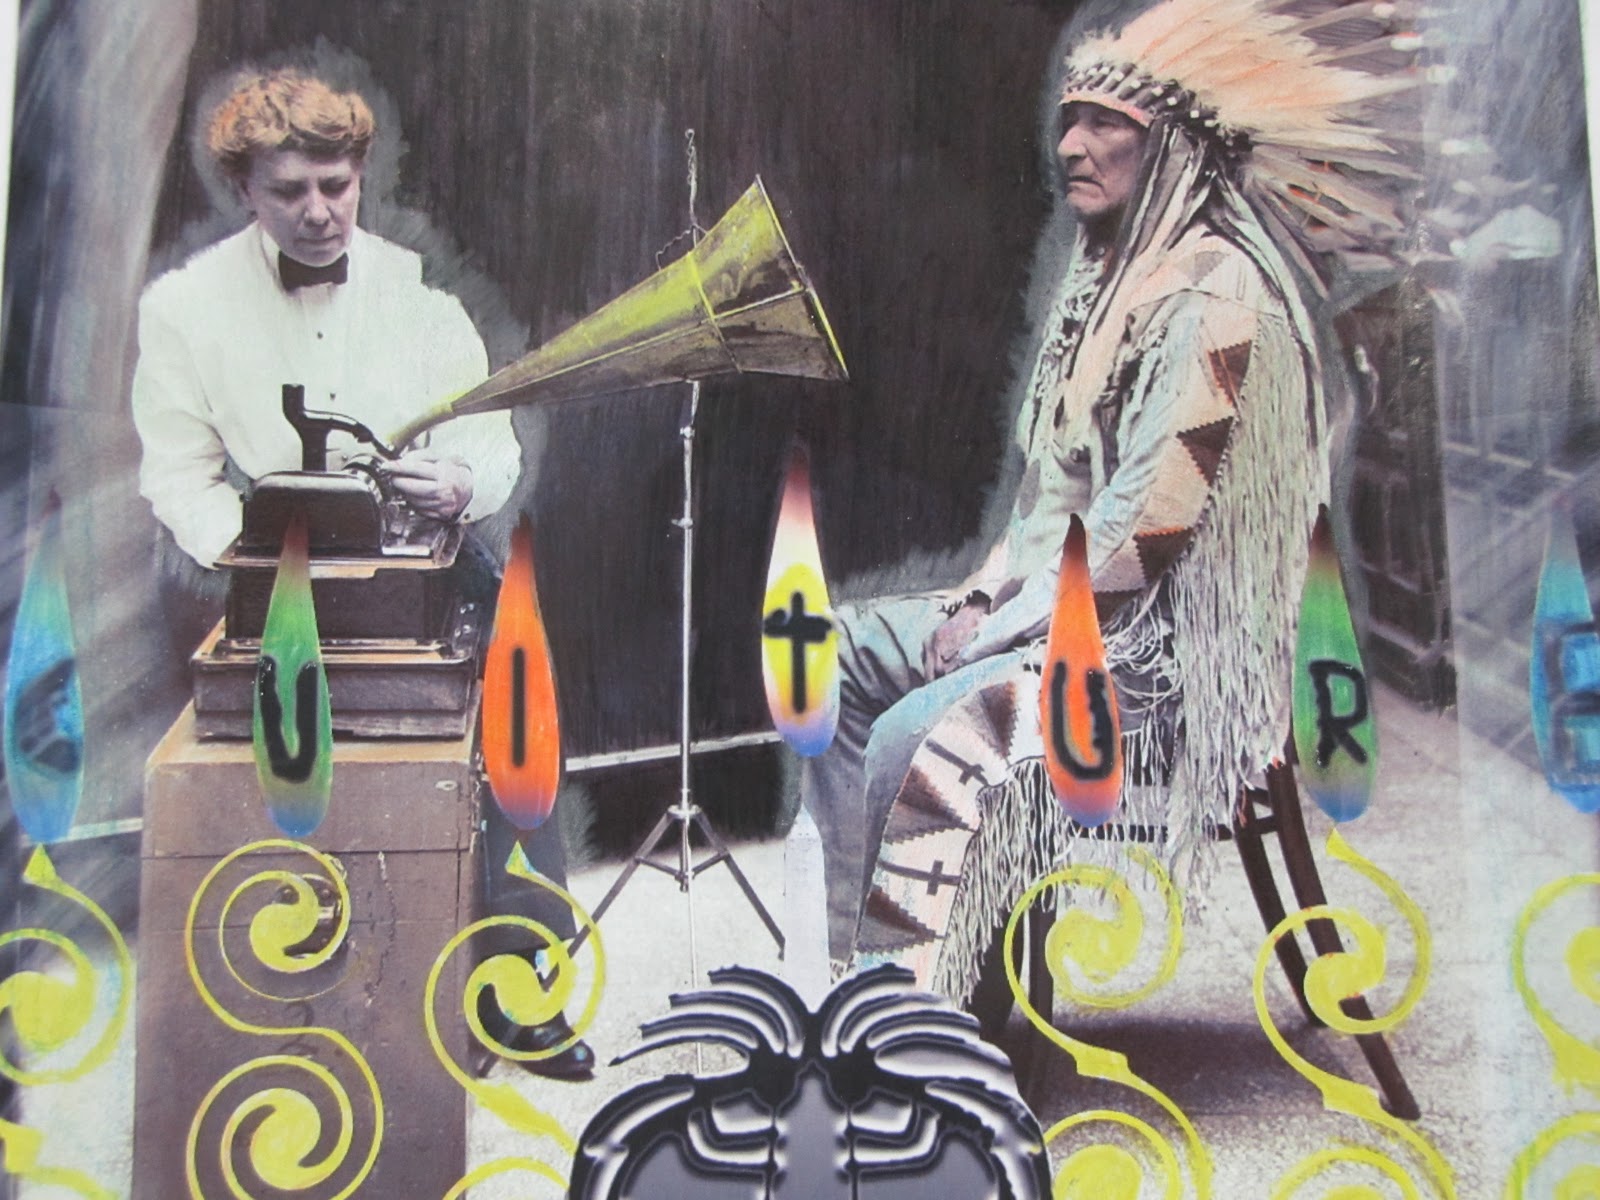
Jose worked on adding images to a old photo of a woman taking dictation from a Native American chief.

Patrick spent the second day working on an image of a lion. He was swirling out the edges of the lion's body which was giving it an otherworldly quality.

Aubrey was altering a picture of some strange-looking old-fashioned circus people. He added color and pasted some industrial buildings into the skyline.

Tenzin's boxing guys were turning into superheroes and he was planning on adding some effects to make them look like cartoons from the 50s or 60s. 

Leija was combining several different photos, including photos of his friends, to make vampire creatures.

Kim brought some of her own drawings, which she had photographed and wanted to try working with in Adobe Illustrator.

Jeremy's artwork was based on an old photo of a smiling small person.

Eddie's piece shows thoughtful, careful work. He printed out a picture of a kindergarten classroom after the Chernobyl Disaster of 1986. He almost seamlessly transposed a photo of a child from the early 20th Century onto it. He worked really hard to cut out that image of the child and he pasted it on so that it looks like the child is holding the bar of one of the cribs. 
Aubrey's image is impressive too. He added smokestacks and pollution and then colored his whole image to look like a smoggy day.
At the end of the second day, all the students were coming up with very interesting work, and I was really looking forward to watching the images evolve during the third session and to seeing the final results.

On the third day, we began with a quick and very effective lesson by Cristina on how to connect to an ITA network drive, where students could access, store, and share their work. Then, we spent the rest of the day working on our artwork. The students have all created some FANTASTIC pieces: 
Kim had scanned in some of her own artwork at home, then she added a background in Adobe Photoshop and created an interesting cherry blossom design for her figure's clothing.


Kim's Cherry Blossom Kimono Picture


During the second week of class, Patrick unfortunately lost his first lion picture; he had not been saving his work and there was a problem with his computer, so after he rebooted, he was unable to retrieve his really great work. But, he did not let that stop him! He learned from the experience (he was saving constantly while working on his second picture!) and he created ANOTHER AWESOME one, done mostly in Photoshop. He added wings to the lion, and then put the whole figure into a completely different background. I really like the arc of light on the right. Very effective image and fantastic learning experience--way to go Patrick!!

Natalia's Child in the Woods is really fabulous too:

This is not her final product, though, because she has been adding some cut-out collage that really creates some interesting effects . . . those woods have eyes!

Juan finished his image of the Chief and then added some coloring effects on the final product. He used colored pencils on a print out, which he blended with his fingers. This made the surface smooth and glossy, adding an interesting dimension to the picture. After that, he scanned in his entire final product:


Jeremy used Photoshop and added construction paper collage to create a very amusing character:


Tenzin finished his image of two men boxing:


This custom workshop has been a success: everyone learned a lot, had some fun, tried something new, and made a project he or she can be proud of. As an instructor, I found it rewarding to share my own talents with the students and show them how technology can be part of our lives in an interesting and exciting way.