Showing posts with label Custom Workshop. Show all posts

Wednesday, October 26, 2011

Introducing: After Effects

April Arevalo
- ITA Tech Instructor -

After Effects is a complex program that has endless possibilities of what can be created. I tend to focus a lot on text, not just what the text means but also the aesthetic feel of the text. This session I wanted the students to become familiar with the navigation and some of the functions of After Effects. The plan for this session was to give the students a basic structure of how to do a space warping text. Once the structure was complete, the students had the freedom to enhance their animation with a variety of options.

Although I felt the structure was confusing at times the students had no trouble in asking for clarification and getting back on track. Because of the complexity of this software, I had to be pretty strict about exact values for many parts of the project. However, the students were clever and had their own interpretations. They successfully came up with different text paths, styles, and compositions. This picture is a sample of a movie title as it enters the time echo effect that causes it to look like it is warping.

Once the structured part of the lesson was complete and the students were introduced to backgrounds with masks and the particle world the creativity really began to flow. Approaching these two elements in more of a broad sense while still highlighting major components really played to a key aspect when using After Effects. Creating effects that are visually engaging in this program calls for experimenting or simply just playing around with the effects. The difficult part is that it requires a lot of computer processing power, so it can be a little slow going to experiment and see the results right away.

As the students dove into adding backgrounds and different particle elements it became clear that the structured part was needed and that this freedom would add another level of complexity to what the students had already made. This student made something simple look very cool and colorful.
Overall the students engagement, curiosity, patience, and creativity really made this session more than I had ever anticipated. Hopefully since this was the first session ever to use the program After Effects when other sessions are offered the students will be excited to learn and create what ever the focus of that session happens to be.

Thursday, September 1, 2011

Back to School Technology Preview...

This year at the IT Academy, students will have the various opportunities to enjoy and learn about all kinds of things!

Here is a list of some of the things we have in store for the Technology Labs:

Poster Mosaic: Each student creates one piece of a whole illustrated poster!
"Campfire Tales": Creative storytelling through digital audio!
Social Justice Social Media:
Students bring a cause and learn how to effectively educate others about what they care about!
Self-Portrait: Illustrate your self or your friends in creative ways!
Accessibility and Assistive Technology: Creative journey into how technology can help in many, many ways!
Using AfterEffects in Post-Production: Learn ways to use AfterEffects to adjust the video you've captured and add the subtle visual qualities that can transform the viewer experience. 
Space Text: Moving typography in film using AfterEffects!
Going Green: An exploration of the green movement in technology!
Hack This: 
Not that kind of hacking... learn to make technology work for YOU in ways it wasn't necessarily designed for.
Data Visualization: Learn about the unusually fascinating and exciting world of visualizing data!
Audio Equipment Virtualization: Using virtual synthesizers, drum machines, patch cords, and effects racks -- ON A BROWSER! http://audiotool.com/app
Polyvore Magazine Layout: Learn some of the tricks of the trade in magazine page layout, using a super cool and fun website! http://www.polyvore.com/
Commercial Fun! Make short (50 seconds or less) commercials, focusing on storyline and product placement.
How DOES that work? Ever wondered how that worked? Learn some tools to find out!

It's going to be quite a semester! Keep looking out for future updates and see the amazing work of our students as these workshops unfold!

Monday, March 28, 2011

Stepping Towards the Future

April Arevalo
- ITA Tech Instructor -

I feel that having the students thinking about speech, dialog, words and how they can be used to express feelings, thoughts, the past and present is a great way to develop clear and meaningful messages in student projects. For me personally being able to write down what has occurred in my life is a huge tool to help me reflect on what I've accomplished, and how I can change my future. Lately I have been thinking about inspirational words and how to incorporate technology to display something positive. I recently thought of doing an "inspirational word" poster in Adobe Illustrator. I think it will be a great way for the students to realize that being creative and original and having fun and is a key part to portraying a strong message.

When students get to create in a way that involves colors and different aspects of "art" they don't necessarily see that a message is being formed. When more than one glance is taken, thousands of messages can be portrayed, ones that they hadn't thought of the first time. I saw this to be true while I assisted in the Mandala Custom Workshop. The students seemed to be creating things that were captivating to the eye and at a second glance deeper messages were shared. There were themes of nature and the beauty of the universe. Projects like this are beginning to open the minds of the students to something more than just doing projects because they have to.

By coming up with clearer messages, I feel the students will appreciate what they are creating a lot more and pursue future creation on their own.

Thursday, January 13, 2011

Moving PowerPoints

Cristina Lor
ITA Technology Instructor

In the 2010-2011 fall semester, ITA devoted four lab sessions to the Moving PowerPoint workshop which was created to not only show the students how they can use simple programs like PowerPoint to create complex animations like in Flash, but to give the students a chance to create and finish a Showcase project, for this year's Showcase Presentations at Thoreau and Orchard Ridge Elementary schools.

The first two sessions housed the same five students. The small classroom allowed each student to have more time with their instructor and create quality final products.

The final products were impressive, and all the students learned a bunch about how to plan out an animation with sound effects in a way that can keep the audience interested!

Unfortunately, these animations can't be posted on the web in a way that really shows off their full-impact, so no student work is posted here.

Wednesday, January 5, 2011

Games from Scratch Session - Instructor Reflection

If you read Paul's posts about the first two sessions of our Custom Workshop on creating games from Scratch, you'll notice he points to a third, and final post...

Originally, I was going to do an update on the 3rd day of Games from Scratch. What I would rather do, considering the lateness of this post, is to update with a reflection on how the class went, and my recommendations and urging for others to help take this class into a more fruitful direction.

First off, as inferred in Paul's blog entries on this class, games are easy to create, good games are as difficult as any engineering project. Computer programming can be easy, anyone can take five minutes and print "Hello World" on the screen with a few simple commands. Making computer programs that are able to detect human behavior, constantly assess performance of the players and create an enjoyable environment is extremely difficult. Asking students to try to make good computer games using more advanced programming techniques in three classes, I found out, is borderline impossible. Not for lack of try from the students, as they were all incredibly engaged and passionate about their projects, but because of the time it takes to individually assess each student's performance levels in programming and design, and making a lesson plan that can work accordingly to their needs.

For those who are unfamiliar with Scratch, I urge you to take a look at this website and register. Take a look at a few of the games and the other programs make through Scratch. For those unfamiliar with basic game design, have a look at these interactive programs from Kongregate. Much of what you're seeing in these two instances were shown to the students as part of their curriculum. When we finally had the students modify, not design, their own games, the results were good...but to make them great, we will need to do the following.

1) More class sessions. I've taught this class before, and it has taken well over 12 sessions just to get students thinking about making board games. To get students to make a transition from thinking about games to making games, it will take more than three sessions.

2) Paper prototyping. Many of the best video games have been done previously using paper prototyping. This method of game design helps designers make cheap replicas of their virtual space without the cost, and gives them a vivid representation about what works and what does not work. This video may help provide insight into what I am talking about:


3) Promote the value of failure (reflection). I know that sounds strange, promoting failure amongst the students...but let me propose using a different word for failure that may make you feel better...reflection. You see, unlike standard testing practices in schools, when a student fails, they receive little opportunity to make up for their work, and therefore reflection is rendered unnecessary in the eyes of the student. Why reflect on what they could have done if they can do nothing to change it? Failure as a game designer provides insight into things that are not working, and if the designer is serious enough about their final project, they will change those mistakes because they want a better project. In many of the game design workshops that I have taught, one of the first things you have to do is promote constructive criticism, and teach that failure is not final, but is part of a continuing process to help make that project and that designer stronger.

I know this may sound like an unusual post. But I do take game design, this class, and the idea of collaborative learning quite seriously, and wanted to give you, the reader a honest insight into this process. Please, if you do have questions about game design, this class, or anything in my post, just send me an e-mail at rmmartinez@gmail.com or leave a comment below!

Saturday, November 20, 2010

Sound in Film

Sound in Film is a class that aims to improve all aspects of audio in student films. Students learned about professional film sound, multiple sound layer editing, techniques to help achieve common audio effects and how to put it all together on screen.

Students came into this course knowing little to nothing about professional audio editing. They were first introduced to professional examples of sound design. Here are a couple examples from the film Star Wars.


Students learned how to film dialogue with multiple angles and using multiple takes. This allows for easier audio editing in post-production. Then, the students learned about ADR (Automated Dialogue Replacement) or overdubbing all the dialogue in a film. They learned how to use high quality microphones to produce better sound than what is recorded from internal camera microphones. In this case we used the Zoom - H2 audio recorders, which are a great product and reasonably priced!

The students were then challenged to create their own film project, using their own scripts. Here's the catch: all the audio had to be created in post-production. This means that no audio captured during filming was allowed to be used "as-is." There were 4 groups and only 2 of the groups considered their projects complete. It was a challenging task that required hard work and dedication. It also required time, and sometimes we run out of that fast. And, although some of the final projects didn't turn out in the end, the learning along the way was invaluable. Students also learned the hard work and pre-production required to finish a project for a deadline.

Here is Clara and Lucy's final project, a trailer for an original gripping feature film called Code Red. It's an upcoming thriller (not really) about foiling a planned attempt to assassinate the president. (Spoiler Alert!) We asked, and he ends up being unharmed in the movie.


Thanks for reading!

Saturday, October 23, 2010

Video Games and Scratch: Day 2

Hi, Paul here again :)

Today began with a quick review of the concepts discussed on the first day, with students talking once again about game mechanics and dynamics. Terrence was right up front, quickly explaining what dynamics were.

Next, we talked about the games they played last time, and what was fun and what wasn't. Jasmine had played Rock Band, and had a lot more fun than she had initially expected, rockin' out to the music with the best of them!

It was great to see high school students critically thinking about video game play and why video games involve so much thought from the developers, and so many different intelligences from the players.

The review complete, the first exercise was to find a game review online and read it closely, paying attention to how the reviewers talked about the game and how it fit in with the topics we had discussed. Each student took notes on the review and then stood before the class in turn, presenting their review and talking about what they liked and what confused them. Some good points were raised, including the role of the ESRB and how it fits into the gaming industry.

Finally, the students downloaded Scratch, a free open source software developed by students at MIT to teach about programming, onto their computers and checked out the games available at MIT's website. RocketMan was very popular, and they were able to download it and take a look at how it is set up in Scratch. Hopefully, it'll give them some insight into making games with Scratch, which they'll be doing next session!

~written on 9/25/2010

Video Games and Scratch: Day 1

Today was the first day back at ITA, and we jumped in with both feet with the Video Games in Scratch custom workshop. We took the students over to the video game lab in the UW-Teacher Education building so they could get the full experience.

Ryan started them off with a short lecture about concepts behind video game design, starting with Game Mechanics, Dynamics, and Aesthetics.

The students were a little uncertain about talking about video games in such terms, but it wasn't long before they started to get into the discussion. Jacob raised some good points about why some games were more appealing than others, citing things like storyline and challenge, and Saige told everyone about her challenges playing Super Mario Kart against her brother.

Next, Ryan showed them the game Braid, and everyone had a great time playing that on the projector so the others could watch. Terrence did a great job navigating the difficult terrain. Way to go, Terrence!

Finally, the students were split up so they could play whatever game they chose form the lab's wide-ranging stock, with the intent that they pay attention to the things we had discussed. With things like mechanics and dynamics in mind, they played Rock Band, Call of Duty, and the Orange Box, enjoying themselves immensely, while learning something at the same time.

All in all, a great day for ITA!!!

~written on 9/11/2010

Friday, October 22, 2010

Photoshop Actions and Scripts


For the first 3 sessions of IT Academy Labs, this fall, we offered several CUSTOM WORKSHOPS designed by individual instructors on staff. Chris Spears, one of our seasoned Photoshop experts, offered a workshop entitled, Photoshop Actions and Scripts.

Photoshop Actions and Scripts was a workshop all about increasing project productivity in Photoshop. Actions and scripts are very useful, but are very commonly and easily overlooked. They make the most tedious job, the most simple to-do in a matter of seconds, and you have the option to use ones provided, create your own, or download ones that other people have created!

The first session served mostly as an introduction to the concept and functionality of actions and scripts. The second session was centered a bit more around actions. And, the third and final session was all about using both actions and scripts together in different projects.

Being the first time ITA had offered the Custom Workshops, Session 1 of Photoshop Actions and Scripts had started off a bit slow. As stated above, this was an introductory session which served primarily as the introduction of the concepts behind actions and scripts as tools used for increasing project productivity so it was not very project oriented. It was more of a chance for students to get familiar with learning how to use and incorporate these two aspects of Photoshop in different kinds of projects. This included:
  • creating and recording steps
  • saving actions
  • reading scripts and reading through action steps
  • downloading scripts and actions from trusted sites

Nonetheless, the students seemed to be really amazed at how the actions and scripts were carried out and how much they could accomplish in such a short amount of time once they were ran.

By the end of the session the students had a couple of different projects they finished; one project was from a batch rename script, which re-names all your files for you using a systematic approach. One was from an action they downloaded from the internet and loaded into Photoshop (these varied), and their last one was from an action they created/recorded themselves (these also varied).

Check out some of the student examples!


Session 2 was a lot more interesting for the students, as it was much more project-oriented. We think the students got a better idea this session of what can really be done with scripts and actions in Photoshop, after having the necessarily somewhat slow-paced introduction to them.

First, we started off with a quick review from last session just about the main purpose of actions and scripts and their many uses. Then, we jumped right into the first project which was "Reading" actions--this project consisted of downloading an action of a cool effect from the internet (http://www.turningturnip.co.uk/photoshop/photoshop-actions/photo-box-action.php), loading it into Photoshop, viewing its contents and recorded steps, and then finally attempting to re-create the cool effect using the action as a step-by-step guided tutorial. While this was a bit tedious, it provided a great way to REALLY understand how these things work!

The purpose of this project was to get students more familiar with the process and order at which actions may be recorded, and also to get more familiar with the Photoshop interface and different tools and such, as they encountered many new terms for different Photoshop tools and processes through reading the recorded steps of the action. Unfortunately, the lead instructor, Chris, didn't notice that this particular action in order to achieve this cool effect was entirely TOOOO long to "read" in its entirety. So about a third of the way through reading the action, Chris decided to just stop and had the class hit the "play" button to finish it up... it was well worth the wait though, as the students got to delve deep into the script for a while, and then they were very relieved to be able to stop early.

Next, the students created their own actions which they saved to their folders for other students to load up and attempt to "read" themselves to see if they could get the same effects (although most of them probably just hit the "play" button to speed up the process...which is what the workshop was all about anyways so the students clearly grasped that concept quite nicely).


The final session began with a review in the form of a walk-through project called "Clipping Mask Collage." The students really enjoyed this project and were very satisfied with their results. This, again, was a way to give the students a bit more experience with creating longer actions and getting a better feel for the idea that not all steps that one may take to create a project in Photoshop can be recorded with actions (such as the Brush Tool), and also that sometimes there needs to be a specific order to how you record your actions in order for them to give the same effect when you run them again on another image.

Check out the examples!


For the remainder of the session the students created their own projects using different actions and scripts (custom, default, and/or downloaded). Here are some examples of their independent Photoshop Actions and Scripts projects from Session 3!

Wednesday, October 20, 2010

Slide Me To Vietnam

With the IT Academy's new curriculum in high motion, the students were divided up into classrooms for three and five session custom mini-course workshops. For the "Slide Me To Vietnam" workshop, the end product was a highlight video for the non-profit organization, the University of Wisconsin-Madison's Vietnam Health Project.

Ten students enrolled in this workshop and they each had their own section to the movie. Using iMovie on Macs, they sorted through 12GB's worth of pictures, animated a slideshow, and recorded their voices to tell the story.

Session 1 was sweet and simple. During the morning survey, the lead instructor Ann asked the students what exactly is a landfill community? They had a vague interpretation to the extent of "people that live in a landfill." By the end of the three hours, the students understood that these families live and work on the landfill. They sort through garbage for 12 hours a day while earning only 7 dollars for the day, and their children cannot attend public schools, as their parents never had the access to acquire birth certificates for them. By the end of the session, the students developed sympathy to help these families and could not wait until next session to begin their portion of the video.

Session 2 started with an introduction to iMovie. iMovie is a program we've never had a chance to teach at ITA. The students' energy drained as they sorted through hundreds of pictures. When they needed to record their voice-over, the fatigue echoed through their voices.

The students temporarily lost the sense of teamwork and instead of working together to make sure the video contained consistent transitions and text, they went on with their own creativity. The hectic rush at the end of the day to upload to YouTube the preliminary draft, made the environment even more stressful. At the end of the day the students anxiously wanted to leave, but before they left Ann asked them why they were doing this project. Ashanti simply replied "to help those children." Suddenly the purpose behind the project became the focal point, which showed as we shifted gears in the third, and final, day of the workshop...

Here is one student's draft from the end of day two:


Session 3 came two weeks later and the students knew they HAD to finish the video. Before they began to work, Ann distributed Thank You cards created by the children of the landfill community. Even though they lived over five thousand miles away, at that moment the distance did not seem so far. As a class, the students did a peer critique of each draft. They understood that consistency was the key to allow the videos to piece together and forced each other to perfect their section. In only forty minutes, they finished. The students rendered their final product and Ann pieced together the video simply by clicking and dragging. Watching the video as a class, the students were proud of their new creation that would be donated to the organization.

And now, you can view the product of all the hard work and effort to make the following video slide show:

Friday, October 15, 2010

Real and Digital Art: ITA Students Have "Mad Art Skills"!

We started our first session with me (Eliza) showing my artwork and sharing with the students my system for creating it:

I find a digital image, print the image, and then transfer it onto an art board. From there, I paint on it with acrylic paints and then create additional layers by adding collage. I have also been taking photos of the paintings and then continuing to work on the image within Illustrator. Then I print the Illustrator artwork, collage it on to the painting, and continue the process until I am satisfied with the results. Because this process involves both real-space artwork and virtual-space artwork, I have a series of digital images as well as the final painting.

Saint Lucy, by Eliza

For the workshop, I selected a collection of interesting photographs from Shorpy.com. The students could either draw and collage directly on the printed black and white photos, or download the image file and begin altering the image digitally. Then they could print their images, take photos of them, and continue the process using collage.

The first day, students seemed to get a slow start, and on the second day they got going right away and they made rapid progress!

Natalia used the collage technique on a digital image of a child in a forest. It has a fairy tale feel to it.

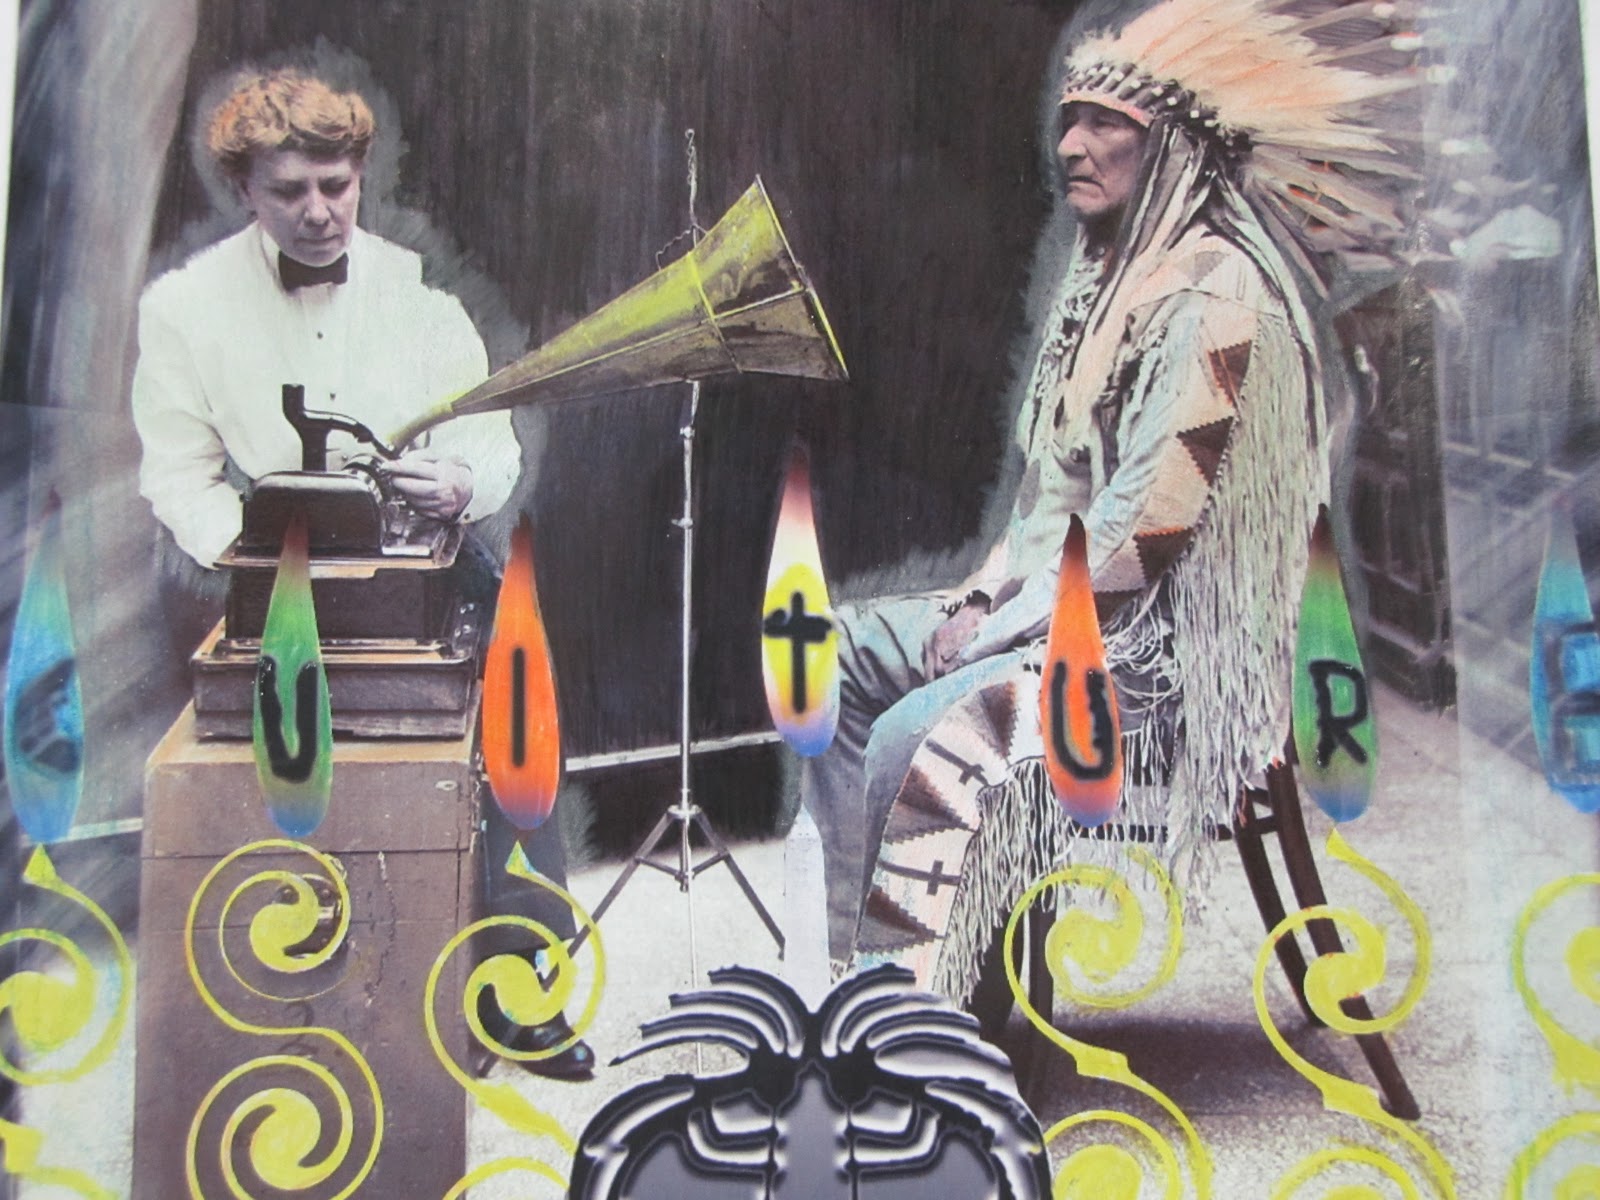
Jose worked on adding images to a old photo of a woman taking dictation from a Native American chief.

Patrick spent the second day working on an image of a lion. He was swirling out the edges of the lion's body which was giving it an otherworldly quality.

Aubrey was altering a picture of some strange-looking old-fashioned circus people. He added color and pasted some industrial buildings into the skyline.

Tenzin's boxing guys were turning into superheroes and he was planning on adding some effects to make them look like cartoons from the 50s or 60s. 

Leija was combining several different photos, including photos of his friends, to make vampire creatures.

Kim brought some of her own drawings, which she had photographed and wanted to try working with in Adobe Illustrator.

Jeremy's artwork was based on an old photo of a smiling small person.

Eddie's piece shows thoughtful, careful work. He printed out a picture of a kindergarten classroom after the Chernobyl Disaster of 1986. He almost seamlessly transposed a photo of a child from the early 20th Century onto it. He worked really hard to cut out that image of the child and he pasted it on so that it looks like the child is holding the bar of one of the cribs. 
Aubrey's image is impressive too. He added smokestacks and pollution and then colored his whole image to look like a smoggy day.
At the end of the second day, all the students were coming up with very interesting work, and I was really looking forward to watching the images evolve during the third session and to seeing the final results.

On the third day, we began with a quick and very effective lesson by Cristina on how to connect to an ITA network drive, where students could access, store, and share their work. Then, we spent the rest of the day working on our artwork. The students have all created some FANTASTIC pieces: 
Kim had scanned in some of her own artwork at home, then she added a background in Adobe Photoshop and created an interesting cherry blossom design for her figure's clothing.


Kim's Cherry Blossom Kimono Picture


During the second week of class, Patrick unfortunately lost his first lion picture; he had not been saving his work and there was a problem with his computer, so after he rebooted, he was unable to retrieve his really great work. But, he did not let that stop him! He learned from the experience (he was saving constantly while working on his second picture!) and he created ANOTHER AWESOME one, done mostly in Photoshop. He added wings to the lion, and then put the whole figure into a completely different background. I really like the arc of light on the right. Very effective image and fantastic learning experience--way to go Patrick!!

Natalia's Child in the Woods is really fabulous too:

This is not her final product, though, because she has been adding some cut-out collage that really creates some interesting effects . . . those woods have eyes!

Juan finished his image of the Chief and then added some coloring effects on the final product. He used colored pencils on a print out, which he blended with his fingers. This made the surface smooth and glossy, adding an interesting dimension to the picture. After that, he scanned in his entire final product:


Jeremy used Photoshop and added construction paper collage to create a very amusing character:


Tenzin finished his image of two men boxing:


This custom workshop has been a success: everyone learned a lot, had some fun, tried something new, and made a project he or she can be proud of. As an instructor, I found it rewarding to share my own talents with the students and show them how technology can be part of our lives in an interesting and exciting way.