Showing posts with label Art. Show all posts

Friday, December 9, 2011

Cereal Box Design

April Arevalo
- ITA Tech Instructor -

Elements of graphic design can be found everywhere. What better way to teach the students about all the elements of graphic design than by making themselves into what, I hope, gives them the copious energy they have every Saturday morning; a cereal box.

The purpose of this project was to advertise each student in a complete styling. The students didn't necessarily have to be a cereal product, but some students did get creative by adding many aspects of them as a real cereal brand.

The cereal box was split up with each session focusing on a different part, and mastering the same tools that could be applied to the entire cereal box.


Front of the Cereal box:
On this side, the students created digitized self-portraits of themselves. The main tool used for this was the pen tool, a very useful but challenging tool. The students learned very quickly that, while frustrating, this tool can create great, detailed artistry. Starting with a picture of themselves, the students essentially traced over the picture to recreate the image. Still, they would tell you that it is not as easy as it seems. The pen tool requires a keen eye, an understanding of anchor points of curvature of a line, and the use of layers.

After practicing this tool several times, the students were able to tame it and create digitized versions of themselves that looked great.This is a picture of a student, as a final digitized image.


Back of the Cereal box:
In this section, the students created a typographical map of their neighborhood and nearby areas. This section again focused on the pen tool but introduced new elements such as a "clipping mask" and "type to path" tool. The students really developed their pen tool skills in this section. In order to make a typographical map, the students would outline the shapes present in the image of their neighborhood. Then, they would use a new layer to write text of the area they were covering up, i.e. parks and street names. Then, selecting both layers, they would create a clipping mask that would cut the text to the shape they outlined and color it as the shape was colored. The students repeated this for each section of their map.
This is a map of a student's neighborhood entirely made up of text.

Sides and Panels of the Cereal box:
After giving the students a very structured front and back of their cereal box, they were given more freedom for the rest of the box. Keeping in mind that they were creating a cereal box, many of the students created "nutritional facts," based on what makes them who they are. They also started to think of images that could portray aspects of importance to them, such as religion, school spirit, and other things of interest.
These are the side panels for another student's cereal box. She chose to draw her journey at ITA on one side of her cereal box.

For the final result of the cereal box, the students were asked to think about color schemes throughout the box and overall presentation. They are portraying themselves and need to think about what makes something aesthetically pleasing. The majority of students still have some tweaking to do, in order to make their boxes as presentable as possible. In using a website known as "dropbox" the students are able to work on their projects at home and can send us a complete cereal box that they put time into and would be proud to show.

The students came a long way and have begun to understand what it takes to make a complete piece of work/art. This is a great structure for the projects to come in their ITA career.

COMING SOON:
Below are some photos of the actual cereal boxes! We displayed them at this year's 12th Annual Holiday Luncheon:

Wednesday, October 26, 2011

Exploring Aviary

Felipe Gacharna
- ITA Tech Instructor -

For the October 22nd ITA session, students had the option to join a choice session that explored Aviary. Aviary is a free online set of tools that allow for image editing and creation as well as music editing and creation. In particular, students got to explore the Phoenix photo editor, similar to Adobe Photoshop, the Raven vector editor, similar to Adobe Illustrator, the Myna music creator, similar to Sony ACID, and the Peacock effects editor, which is unlike most programs the students have experienced before in ITA.

All the Aviary software runs in a browser and is free for anyone to use! We used the specialized education version to great success, which allowed us to oversee much of what the students were able to accomplish in this session.

This student was very proud of the work she could do to her photo in a web browser software:


Phoenix (like Photoshop)


Phoenix has many of the same features that students have already learned in Photoshop, including layers, blending modes, filters, and the clone stamp tool, to name a few. In Phoenix, students got to play around with a base image of a hot air balloon that I provided.

Using the hot air balloon image, students were able to duplicate some of the functionality they are familiar with in Photoshop and then take it to another level with the Peacock effects editor.

Peacock (a unique photo editing tool)

You can "push" a layer from Phoenix directly to Peacock, edit the layer in Peacock, and then send it back to Phoenix. Here are some pictures of the edited hot air balloon image as well as a screen shot of the Peacock editor, showing the unique user interface.


These edited balloon images showcase some of what you can do with Phoenix and Peacock.


This screenshot of Peacock shows the "node-based user interface" that the tool uses. It's a rather unique user interface (UI) where the user is provided with "nodes" or blocks which they can manipulate. Nodes can be connected through the little "notches" on the top and on the bottom of each. These "notches" are inputs and outputs. Manipulating the inputs and outputs to each node allows for heavy manipulation of images, and since each node has its own properties that can also be manipulated, the user has a lot of power in creating a desired effect.

Here's another screenshot of Peacock showing the nodes more clearly and some manipulation done to a gradient.


Myna (sort of like Sony ACID or a drum machine)

The Myna music creator allowed students to mix sounds from a large library to create beats. Myna provides a simple interface, with several layers of different sounds and each sound having a track, with beats being on or off for a given beat. Volume can be tuned for each sound as well as for each particular beat, so students have a good amount of power in mixing their beats. Here is a screenshot of one of the beats created by a student as well as an over-the-shoulder picture of one of the students working on his Myna project.


Listen to some beats the students made:


Aviary also provides a Hall of Fame where anyone can look through submissions, as ranked by users. Most of the time, the projects actually allow you to open up the program used to create it so that users can view how the project was created. Students had an opportunity to look through the Hall of Fame to see what could be done with the tools they were using and to help them gather ideas of how they could achieve some effects in their final artifacts by looking through the projects that allowed you to see how they were created.

Annual ITA Halloween Costume Contest delivers more treats than tricks

Alison Wilson
- ITA ACT and College Prep Instructor -

Each year, ITA encourages students to look deep within themselves to come up with the BEST Halloween costumes possible. While few students participated this year, the costumes did not disappoint. Not only did these students have the opportunity to go trick-or-treating in each of their classes, but ITA staff was on the lookout for the most creative, fun, inspiring, or well-executed costumes.

Without further adieu, I present to you the Halloween Costume Contest participants of 2011!

This student sported the unofficial uniform of the US Women's soccer team.


The classic masquerade mask for a sophisticated costume. Also, she loves trees...


It was impossible not to smile when walking past Dipsy, the green Teletubby.


Here is a very convincing crusader, complete with sword and chainmail!


I’m not even sure who this ninja was; this costume was just that good!


Wow! Nice interpretation of Raggedy Ann, red Converse and all! You rock!


Arrrrrr, mateys! This here be another ITA student as a pirate!


We even had a mime costume. And, some nice miming talent along with it!


With so many AWESOME costumes, it was difficult for staff to choose the winners. In the end, it all came down to just a few votes…

Our runner-up is a TIE between Dipsy and Raggedy Ann. Each of them will receive a $20 Best Buy gift card!

This year’s costume contest winner is the robot from LMFAO’s “Party Rock Anthem” music video. He will receive an iPod shuffle and a $15 iTunes gift card!


A huge thanks to Mary, Sarah, Brianna, Brenna, Ian, Ninoska, Adrian, Josh K., and Islam ! You will each receive a raffle ticket for the End-of-Semester prize raffle!!

Photos by: A.J. Daughtry Krill

Thursday, September 1, 2011

Back to School Technology Preview...

This year at the IT Academy, students will have the various opportunities to enjoy and learn about all kinds of things!

Here is a list of some of the things we have in store for the Technology Labs:

Poster Mosaic: Each student creates one piece of a whole illustrated poster!
"Campfire Tales": Creative storytelling through digital audio!
Social Justice Social Media:
Students bring a cause and learn how to effectively educate others about what they care about!
Self-Portrait: Illustrate your self or your friends in creative ways!
Accessibility and Assistive Technology: Creative journey into how technology can help in many, many ways!
Using AfterEffects in Post-Production: Learn ways to use AfterEffects to adjust the video you've captured and add the subtle visual qualities that can transform the viewer experience. 
Space Text: Moving typography in film using AfterEffects!
Going Green: An exploration of the green movement in technology!
Hack This: 
Not that kind of hacking... learn to make technology work for YOU in ways it wasn't necessarily designed for.
Data Visualization: Learn about the unusually fascinating and exciting world of visualizing data!
Audio Equipment Virtualization: Using virtual synthesizers, drum machines, patch cords, and effects racks -- ON A BROWSER! http://audiotool.com/app
Polyvore Magazine Layout: Learn some of the tricks of the trade in magazine page layout, using a super cool and fun website! http://www.polyvore.com/
Commercial Fun! Make short (50 seconds or less) commercials, focusing on storyline and product placement.
How DOES that work? Ever wondered how that worked? Learn some tools to find out!

It's going to be quite a semester! Keep looking out for future updates and see the amazing work of our students as these workshops unfold!

Monday, March 28, 2011

Stepping Towards the Future

April Arevalo
- ITA Tech Instructor -

I feel that having the students thinking about speech, dialog, words and how they can be used to express feelings, thoughts, the past and present is a great way to develop clear and meaningful messages in student projects. For me personally being able to write down what has occurred in my life is a huge tool to help me reflect on what I've accomplished, and how I can change my future. Lately I have been thinking about inspirational words and how to incorporate technology to display something positive. I recently thought of doing an "inspirational word" poster in Adobe Illustrator. I think it will be a great way for the students to realize that being creative and original and having fun and is a key part to portraying a strong message.

When students get to create in a way that involves colors and different aspects of "art" they don't necessarily see that a message is being formed. When more than one glance is taken, thousands of messages can be portrayed, ones that they hadn't thought of the first time. I saw this to be true while I assisted in the Mandala Custom Workshop. The students seemed to be creating things that were captivating to the eye and at a second glance deeper messages were shared. There were themes of nature and the beauty of the universe. Projects like this are beginning to open the minds of the students to something more than just doing projects because they have to.

By coming up with clearer messages, I feel the students will appreciate what they are creating a lot more and pursue future creation on their own.

Tuesday, November 23, 2010

Adobe Illustrator - Class of 2014

Chou Thao
ITA Technology Instructor

The Adobe Illustrator class allows students to take a sketch of their own (done with paper and pencil) and digitize it onto a computer using Illustrator. This doesn't mean that someone who wants to learn to use the program has to be a great drawer or artist. Illustrator has a bunch of tools for artists and non-artists alike to make professional and interesting graphics for tons of purposes, from print to web!

The Illustrator class was split into two classrooms taught by Chou, Cristina, Marc, and Tenzin. The first project's main goal was for students to get comfortable with the program and get a feel of how it works. The assignment was to create your very own penguin character using pre-made symbols of penguin parts. The results were amazing as students used their creativity to make unique penguins.


As the class went on and students learned the various tools the program offered they realized the difference between vector images and raster images. In Illustrator vector images can be made from raster images by utilizing the live trace tool. Students were put into groups of four and asked to use this tool to create a "four seasons" piece. They "live traced" one picture and color it in with the colors of the season they were assigned from their groups. The four seasons project was interesting because of how each student portrayed the same season with their unique perspective.


The students were learning Adobe's CS5 and they got a chance to test out the new perspective tool. Using the perspective tool students were able to create a city block with two different angles and create a 3D effect. Students picked up this tool very quickly and created some nice work.


To show what the students gained from the Illustrator class, they were asked to create a web site layout from scratch using Illustrator. This was a little bit of a challenge because the students have had very little experience in how websites are created, but after a few examples ideas started to pop.

Friday, October 15, 2010

Real and Digital Art: ITA Students Have "Mad Art Skills"!

We started our first session with me (Eliza) showing my artwork and sharing with the students my system for creating it:

I find a digital image, print the image, and then transfer it onto an art board. From there, I paint on it with acrylic paints and then create additional layers by adding collage. I have also been taking photos of the paintings and then continuing to work on the image within Illustrator. Then I print the Illustrator artwork, collage it on to the painting, and continue the process until I am satisfied with the results. Because this process involves both real-space artwork and virtual-space artwork, I have a series of digital images as well as the final painting.

Saint Lucy, by Eliza

For the workshop, I selected a collection of interesting photographs from Shorpy.com. The students could either draw and collage directly on the printed black and white photos, or download the image file and begin altering the image digitally. Then they could print their images, take photos of them, and continue the process using collage.

The first day, students seemed to get a slow start, and on the second day they got going right away and they made rapid progress!

Natalia used the collage technique on a digital image of a child in a forest. It has a fairy tale feel to it.

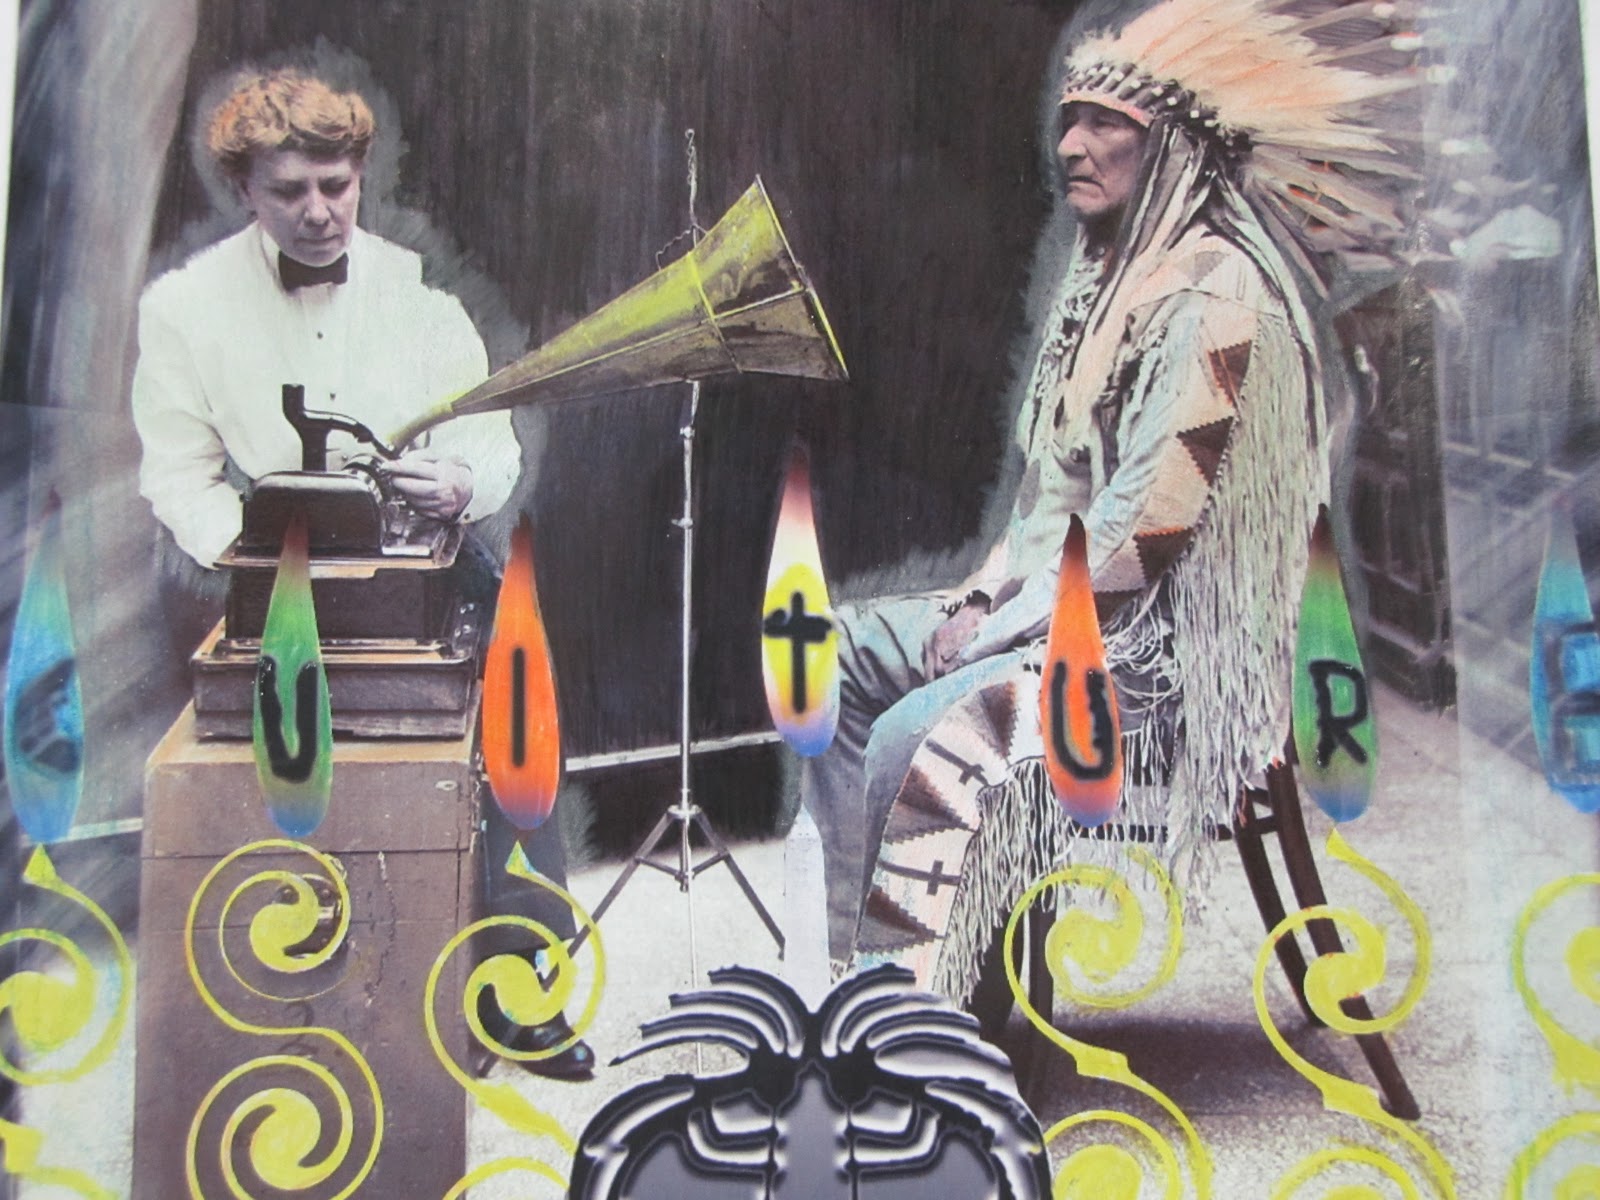
Jose worked on adding images to a old photo of a woman taking dictation from a Native American chief.

Patrick spent the second day working on an image of a lion. He was swirling out the edges of the lion's body which was giving it an otherworldly quality.

Aubrey was altering a picture of some strange-looking old-fashioned circus people. He added color and pasted some industrial buildings into the skyline.

Tenzin's boxing guys were turning into superheroes and he was planning on adding some effects to make them look like cartoons from the 50s or 60s. 

Leija was combining several different photos, including photos of his friends, to make vampire creatures.

Kim brought some of her own drawings, which she had photographed and wanted to try working with in Adobe Illustrator.

Jeremy's artwork was based on an old photo of a smiling small person.

Eddie's piece shows thoughtful, careful work. He printed out a picture of a kindergarten classroom after the Chernobyl Disaster of 1986. He almost seamlessly transposed a photo of a child from the early 20th Century onto it. He worked really hard to cut out that image of the child and he pasted it on so that it looks like the child is holding the bar of one of the cribs. 
Aubrey's image is impressive too. He added smokestacks and pollution and then colored his whole image to look like a smoggy day.
At the end of the second day, all the students were coming up with very interesting work, and I was really looking forward to watching the images evolve during the third session and to seeing the final results.

On the third day, we began with a quick and very effective lesson by Cristina on how to connect to an ITA network drive, where students could access, store, and share their work. Then, we spent the rest of the day working on our artwork. The students have all created some FANTASTIC pieces: 
Kim had scanned in some of her own artwork at home, then she added a background in Adobe Photoshop and created an interesting cherry blossom design for her figure's clothing.


Kim's Cherry Blossom Kimono Picture


During the second week of class, Patrick unfortunately lost his first lion picture; he had not been saving his work and there was a problem with his computer, so after he rebooted, he was unable to retrieve his really great work. But, he did not let that stop him! He learned from the experience (he was saving constantly while working on his second picture!) and he created ANOTHER AWESOME one, done mostly in Photoshop. He added wings to the lion, and then put the whole figure into a completely different background. I really like the arc of light on the right. Very effective image and fantastic learning experience--way to go Patrick!!

Natalia's Child in the Woods is really fabulous too:

This is not her final product, though, because she has been adding some cut-out collage that really creates some interesting effects . . . those woods have eyes!

Juan finished his image of the Chief and then added some coloring effects on the final product. He used colored pencils on a print out, which he blended with his fingers. This made the surface smooth and glossy, adding an interesting dimension to the picture. After that, he scanned in his entire final product:


Jeremy used Photoshop and added construction paper collage to create a very amusing character:


Tenzin finished his image of two men boxing:


This custom workshop has been a success: everyone learned a lot, had some fun, tried something new, and made a project he or she can be proud of. As an instructor, I found it rewarding to share my own talents with the students and show them how technology can be part of our lives in an interesting and exciting way.