For the first choice session of the year, a workshop focused on computer security titled Hack This! was offered. The session began by looking at a comparison of families of operating systems. A diagram of UNIX and Unix-like systems can be found here.
Here are some of the major topics we covered in class to give students a better understanding of how computer security works, and how to stay safe in a deeper level than we usually have time for...
Windows Password Security
Losing a Windows password happens quite often, especially when the user is no longer a part of the organization, or has simply forgotten the password for the only administrator account on a rarely-used system. There are several options, which you can research on your own. Our students got to try a few. It was helpful for them to learn just why it's so important to have not only a good password, but other layers of protection as well.
Mac Password Security
Mac has the reputation of being pretty secure and safe, but their efforts to be as user-friendly as possible and building everything on a UNIX platform platform have left some vulnerabilities.
In order to gain access to a Mac with a lost administrator password, the best way is to use the Mac OSX Install disc that came with the computer. There are other ways to secure your Mac and help you to remember your password that the students had a chance to discuss as well, including encrypting actual files as well as the OS.
Cracking file-level passwords
While we discovered that user passwords for operating systems are rather unsecure, password encryption for files can be very difficult to crack. We looked at the differences between methods of password cracking, such as Hash decryption, Dictionary set, and Brute force. More information on these methods can be found at: http://en.wikipedia.org/wiki/Password_cracking
Students had a much better understanding of how threats to security occur, and they learned the importance of being very careful when storing information, especially sensitive information.
Live CDs
We booted our computers using Puppy Linux and Knoppix, though we discussed the use of even more alternatives, such as Ubuntu derivaties that can run live, as well as BackTrack, DEFT, and MilaX. A more complete list of LiveCDs can be found here. These live CDs are ways to boot a computer with a non-functioning operating system and access the hard drive. They are an important part of any IT toolkit for retrieving data and also running a full virus scan that can check for rootkits while the primary operating system is offline. With these tools, students can learn a really safe way to recover important work they thought they had lost to a virus or other OS corruption!
Internet Security
We took a tour of www.whatsmyip.org to explore some of the information that is passed on to a website about every visitor and ways that one can protect a computer against malicious attacks by testing what vulnerabilities exist. Using this website, we were able to discuss how to make passwords more secure, geolocation, proxy servers, MD5 checksum. This also led to a discussion to ports, firewalls and creating a DMZ using a dual-firewall setup.
In the End
Of course, our conversation went to all sorts of places, and our students seemed to learn and share a whole lot about the way computers work, the way to work around that, and most of all the importance of having a better understanding of this still somewhat new frontier of online life.
Showing posts with label History. Show all posts
Sunday, October 23, 2011
Wednesday, January 5, 2011
Games from Scratch Session - Instructor Reflection
If you read Paul's posts about the first two sessions of our Custom Workshop on creating games from Scratch, you'll notice he points to a third, and final post...
Originally, I was going to do an update on the 3rd day of Games from Scratch. What I would rather do, considering the lateness of this post, is to update with a reflection on how the class went, and my recommendations and urging for others to help take this class into a more fruitful direction.
First off, as inferred in Paul's blog entries on this class, games are easy to create, good games are as difficult as any engineering project. Computer programming can be easy, anyone can take five minutes and print "Hello World" on the screen with a few simple commands. Making computer programs that are able to detect human behavior, constantly assess performance of the players and create an enjoyable environment is extremely difficult. Asking students to try to make good computer games using more advanced programming techniques in three classes, I found out, is borderline impossible. Not for lack of try from the students, as they were all incredibly engaged and passionate about their projects, but because of the time it takes to individually assess each student's performance levels in programming and design, and making a lesson plan that can work accordingly to their needs.
For those who are unfamiliar with Scratch, I urge you to take a look at this website and register. Take a look at a few of the games and the other programs make through Scratch. For those unfamiliar with basic game design, have a look at these interactive programs from Kongregate. Much of what you're seeing in these two instances were shown to the students as part of their curriculum. When we finally had the students modify, not design, their own games, the results were good...but to make them great, we will need to do the following.
1) More class sessions. I've taught this class before, and it has taken well over 12 sessions just to get students thinking about making board games. To get students to make a transition from thinking about games to making games, it will take more than three sessions.
2) Paper prototyping. Many of the best video games have been done previously using paper prototyping. This method of game design helps designers make cheap replicas of their virtual space without the cost, and gives them a vivid representation about what works and what does not work. This video may help provide insight into what I am talking about:
3) Promote the value of failure (reflection). I know that sounds strange, promoting failure amongst the students...but let me propose using a different word for failure that may make you feel better...reflection. You see, unlike standard testing practices in schools, when a student fails, they receive little opportunity to make up for their work, and therefore reflection is rendered unnecessary in the eyes of the student. Why reflect on what they could have done if they can do nothing to change it? Failure as a game designer provides insight into things that are not working, and if the designer is serious enough about their final project, they will change those mistakes because they want a better project. In many of the game design workshops that I have taught, one of the first things you have to do is promote constructive criticism, and teach that failure is not final, but is part of a continuing process to help make that project and that designer stronger.
I know this may sound like an unusual post. But I do take game design, this class, and the idea of collaborative learning quite seriously, and wanted to give you, the reader a honest insight into this process. Please, if you do have questions about game design, this class, or anything in my post, just send me an e-mail at rmmartinez@gmail.com or leave a comment below!
Originally, I was going to do an update on the 3rd day of Games from Scratch. What I would rather do, considering the lateness of this post, is to update with a reflection on how the class went, and my recommendations and urging for others to help take this class into a more fruitful direction.
First off, as inferred in Paul's blog entries on this class, games are easy to create, good games are as difficult as any engineering project. Computer programming can be easy, anyone can take five minutes and print "Hello World" on the screen with a few simple commands. Making computer programs that are able to detect human behavior, constantly assess performance of the players and create an enjoyable environment is extremely difficult. Asking students to try to make good computer games using more advanced programming techniques in three classes, I found out, is borderline impossible. Not for lack of try from the students, as they were all incredibly engaged and passionate about their projects, but because of the time it takes to individually assess each student's performance levels in programming and design, and making a lesson plan that can work accordingly to their needs.
For those who are unfamiliar with Scratch, I urge you to take a look at this website and register. Take a look at a few of the games and the other programs make through Scratch. For those unfamiliar with basic game design, have a look at these interactive programs from Kongregate. Much of what you're seeing in these two instances were shown to the students as part of their curriculum. When we finally had the students modify, not design, their own games, the results were good...but to make them great, we will need to do the following.
1) More class sessions. I've taught this class before, and it has taken well over 12 sessions just to get students thinking about making board games. To get students to make a transition from thinking about games to making games, it will take more than three sessions.
2) Paper prototyping. Many of the best video games have been done previously using paper prototyping. This method of game design helps designers make cheap replicas of their virtual space without the cost, and gives them a vivid representation about what works and what does not work. This video may help provide insight into what I am talking about:
3) Promote the value of failure (reflection). I know that sounds strange, promoting failure amongst the students...but let me propose using a different word for failure that may make you feel better...reflection. You see, unlike standard testing practices in schools, when a student fails, they receive little opportunity to make up for their work, and therefore reflection is rendered unnecessary in the eyes of the student. Why reflect on what they could have done if they can do nothing to change it? Failure as a game designer provides insight into things that are not working, and if the designer is serious enough about their final project, they will change those mistakes because they want a better project. In many of the game design workshops that I have taught, one of the first things you have to do is promote constructive criticism, and teach that failure is not final, but is part of a continuing process to help make that project and that designer stronger.
I know this may sound like an unusual post. But I do take game design, this class, and the idea of collaborative learning quite seriously, and wanted to give you, the reader a honest insight into this process. Please, if you do have questions about game design, this class, or anything in my post, just send me an e-mail at rmmartinez@gmail.com or leave a comment below!
Sunday, December 12, 2010
Video Commercials -- Choice Session 2
On December 4th and 11th, one choice session was a unit on making video commercials, giving the students a chance to learn something about the art of advertisement. It was good to see that we had an almost 100% attendance, considering the weather, and everyone was bright-eyed and ready to get some video editing done!
We started with a brief primer on advertising concepts, with the students learning about brand recognition and the necessity of economy of information. Commercial makers don't have a lot of time to get their point across to an audience, especially due to cost to buy air time, so we really wanted to enforce a strict time limit on their projects. We followed the lesson with some examples of famous commercials, including the 1979 Mean Joe Greene Coca-Cola ad and the 1984 Macintosh commercial. We talked about the specific principles involved in each ad--what worked, what didn't, what kind of effect the commercial had, etc.
Here's the Coca-Cola ad:
And, the Mac ad:
With all of this information to arm them, the students launched into their projects. To leave enough time for the 11th Annual Holiday Luncheon, the morning session had twice as much time as the afternoon session did, so the afternoon session was really under the gun when it came to their work.
As a result, the morning session went a little higher on concept, with a lot of recording being done, but not a lot of editing. The afternoon session performed with flying colors, all three groups finishing their project by the end of the class. Yay for them! Impressive work!!
Here are the projects that the afternoon class completed:
Great work, everyone!
We started with a brief primer on advertising concepts, with the students learning about brand recognition and the necessity of economy of information. Commercial makers don't have a lot of time to get their point across to an audience, especially due to cost to buy air time, so we really wanted to enforce a strict time limit on their projects. We followed the lesson with some examples of famous commercials, including the 1979 Mean Joe Greene Coca-Cola ad and the 1984 Macintosh commercial. We talked about the specific principles involved in each ad--what worked, what didn't, what kind of effect the commercial had, etc.
Here's the Coca-Cola ad:
And, the Mac ad:
With all of this information to arm them, the students launched into their projects. To leave enough time for the 11th Annual Holiday Luncheon, the morning session had twice as much time as the afternoon session did, so the afternoon session was really under the gun when it came to their work.
As a result, the morning session went a little higher on concept, with a lot of recording being done, but not a lot of editing. The afternoon session performed with flying colors, all three groups finishing their project by the end of the class. Yay for them! Impressive work!!
Here are the projects that the afternoon class completed:
Great work, everyone!
Labels:
Audio,
Choice Session,
History,
Movie,
Photography,
Technology Labs,
Video
Friday, October 29, 2010
Audacity Choice Session!
October 23rd was the first of ITA's new Choice Sessions, wherein the students were put into classes based on selections they made at the beginning of the school year.
I, Paul, taught a class on Audacity, and it was a lot of fun.
In my morning session, the students did very well in getting Audacity up and running on their machines, downloading being an important part of the class since Audacity is free, open-source software, which anyone can download here.
Once the students had everything installed (including the LAME plugin for .mp3 exporting) we listened to some conceptual sound projects, including a nine-person clap performance, written by minimalist Steve Reich, and a Pierre Schaeffer piece from 1948.
Some of the pieces were a little esoteric - more sound than music pieces, but the students got into them just fine, and had some interesting comments about the usage of sound and the messages conveyed.
After that, they were let loose on Audacity, using it to create their own projects, based on sound FX provided to them or anything they could find on www.freesound.org, an internet database full of free sound effects.
Audacity is a great program for just picking up and using, once you get over the inherent plainness of the UI (user interface), and I was surprised by how little help the students needed once they got into the real meat of the assignment.
Different students put together some fun stuff, and everyone asked some great questions about the tools and interface. The afternoon class had some technical issues, at least more than the morning class, which was unexpected. But, that didn't mean that no one got to work! Clara put together a really interesting piece, and Dylan came up with a great concept of background, sci-fi sort of soundscapes.
Take a listen for yourself to some of the students' creations!
~written on 10/23/2010
I, Paul, taught a class on Audacity, and it was a lot of fun.
In my morning session, the students did very well in getting Audacity up and running on their machines, downloading being an important part of the class since Audacity is free, open-source software, which anyone can download here.
Once the students had everything installed (including the LAME plugin for .mp3 exporting) we listened to some conceptual sound projects, including a nine-person clap performance, written by minimalist Steve Reich, and a Pierre Schaeffer piece from 1948.
Some of the pieces were a little esoteric - more sound than music pieces, but the students got into them just fine, and had some interesting comments about the usage of sound and the messages conveyed.
After that, they were let loose on Audacity, using it to create their own projects, based on sound FX provided to them or anything they could find on www.freesound.org, an internet database full of free sound effects.
Audacity is a great program for just picking up and using, once you get over the inherent plainness of the UI (user interface), and I was surprised by how little help the students needed once they got into the real meat of the assignment.
Different students put together some fun stuff, and everyone asked some great questions about the tools and interface. The afternoon class had some technical issues, at least more than the morning class, which was unexpected. But, that didn't mean that no one got to work! Clara put together a really interesting piece, and Dylan came up with a great concept of background, sci-fi sort of soundscapes.
Take a listen for yourself to some of the students' creations!
~written on 10/23/2010
Labels:
Audio,
Choice Session,
History,
Music,
Open Source,
Technology Labs
Wednesday, October 27, 2010
Film Beginnings: Viewing "Nosferatu"
Film Beginnings was a Choice Session where I, Tony Sanchez, go over the humble beginnings of film-making. We go over significant advances in film-making technology from the late 1800s to the early 1900s. Students get to watch clips of mostly short silent films, like the first video below, and some early "talkies," like the second video below. Hollywood and movie theater history were also addressed in Film Beginnings.
The students got the chance to view a film from the era which they've learned about, the 1922 horror classic, Nosferatu. This film fits in perfectly for this choice session at the end of October, because it is the very first incarnation of Dracula in a motion picture, ever. And, it's a silent film from the 1920's!
Halloween. Nosferatu. Silent films. Two classes... It was a good Saturday!
After watching the film, we had discussions that spanned a bunch of topics. We tackled questions such as, why would this be a scary film for the time? What has changed since this film was made, and what seems to be the same in Hollywood? And, students finished off the day with writing a blog entry about what they learned and what they make of all this.
We all talked about how we like to watch this type of film, but that it certainly can bring about sleepiness. We felt it too bad that our current culture is all about fast-moving films that focus more on special FX rather than straight-up acting talent. It was also pointed out that most of us only encounter older films in the classroom, rather than at home, or in the theaters.
After watching the film, we had discussions that spanned a bunch of topics. We tackled questions such as, why would this be a scary film for the time? What has changed since this film was made, and what seems to be the same in Hollywood? And, students finished off the day with writing a blog entry about what they learned and what they make of all this.We all talked about how we like to watch this type of film, but that it certainly can bring about sleepiness. We felt it too bad that our current culture is all about fast-moving films that focus more on special FX rather than straight-up acting talent. It was also pointed out that most of us only encounter older films in the classroom, rather than at home, or in the theaters.
Morning Highlights:
The Film Beginnings Saturday double-header started out with the sleepy freshmen and juniors. Though groggy and silent, they showed that they were interested by being attentive. They also asked great questions during the lecture.
Nosferatu racked up half the class, but was worth every minute. The post-screening discussion was riveting. There was a mixed response to the film, but in the end, students appreciated its importance. Carrie brought up Nosferatu's ears, Jon made good observations about some of the effects and techniques that were used in the film. Everyone was riffing off each other and holding an intriguing discussion. Arissa was the only one who dozed off for a few minutes during the film.
Afternoon Highlights:
The sophomores and seniors were in class the second half of the day. Their attentiveness during lecture was not as high as the morning class, but they were picking up on most of the same points (similar questions on similar material).
Nosferatu was widely accepted by the students, but they were more on the negative side. I heard Thuy Dan say "wow, that was a LONG movie!" but really it was only an hour and a half long... There were a bunch of late arrivals today, due to many Seniors taking the ACT in the morning, but the discussion went pretty well. In the afternoon, we had two dozers, but everyone got the point of the movie.
-Tony Sanchez
PS - If you have a netflix account, you can stream a version of Nosferatu to watch for yourself!
Labels:
Choice Session,
History,
Movie,
Technology Labs,
Video
Saturday, October 23, 2010
Video Games and Scratch: Day 1
Today was the first day back at ITA, and we jumped in with both feet with the Video Games in Scratch custom workshop. We took the students over to the video game lab in the UW-Teacher Education building so they could get the full experience.
Ryan started them off with a short lecture about concepts behind video game design, starting with Game Mechanics, Dynamics, and Aesthetics.
The students were a little uncertain about talking about video games in such terms, but it wasn't long before they started to get into the discussion. Jacob raised some good points about why some games were more appealing than others, citing things like storyline and challenge, and Saige told everyone about her challenges playing Super Mario Kart against her brother.
Next, Ryan showed them the game Braid, and everyone had a great time playing that on the projector so the others could watch. Terrence did a great job navigating the difficult terrain. Way to go, Terrence!
Finally, the students were split up so they could play whatever game they chose form the lab's wide-ranging stock, with the intent that they pay attention to the things we had discussed. With things like mechanics and dynamics in mind, they played Rock Band, Call of Duty, and the Orange Box, enjoying themselves immensely, while learning something at the same time.
All in all, a great day for ITA!!!
~written on 9/11/2010
Ryan started them off with a short lecture about concepts behind video game design, starting with Game Mechanics, Dynamics, and Aesthetics.
The students were a little uncertain about talking about video games in such terms, but it wasn't long before they started to get into the discussion. Jacob raised some good points about why some games were more appealing than others, citing things like storyline and challenge, and Saige told everyone about her challenges playing Super Mario Kart against her brother.
Next, Ryan showed them the game Braid, and everyone had a great time playing that on the projector so the others could watch. Terrence did a great job navigating the difficult terrain. Way to go, Terrence!
Finally, the students were split up so they could play whatever game they chose form the lab's wide-ranging stock, with the intent that they pay attention to the things we had discussed. With things like mechanics and dynamics in mind, they played Rock Band, Call of Duty, and the Orange Box, enjoying themselves immensely, while learning something at the same time.
All in all, a great day for ITA!!!
~written on 9/11/2010
Friday, October 15, 2010
Real and Digital Art: ITA Students Have "Mad Art Skills"!
We started our first session with me (Eliza) showing my artwork and sharing with the students my system for creating it:
I find a digital image, print the image, and then transfer it onto an art board. From there, I paint on it with acrylic paints and then create additional layers by adding collage. I have also been taking photos of the paintings and then continuing to work on the image within Illustrator. Then I print the Illustrator artwork, collage it on to the painting, and continue the process until I am satisfied with the results. Because this process involves both real-space artwork and virtual-space artwork, I have a series of digital images as well as the final painting.
On the third day, we began with a quick and very effective lesson by Cristina on how to connect to an ITA network drive, where students could access, store, and share their work. Then, we spent the rest of the day working on our artwork. The students have all created some FANTASTIC pieces:
Jeremy used Photoshop and added construction paper collage to create a very amusing character:
I find a digital image, print the image, and then transfer it onto an art board. From there, I paint on it with acrylic paints and then create additional layers by adding collage. I have also been taking photos of the paintings and then continuing to work on the image within Illustrator. Then I print the Illustrator artwork, collage it on to the painting, and continue the process until I am satisfied with the results. Because this process involves both real-space artwork and virtual-space artwork, I have a series of digital images as well as the final painting.
Saint Lucy, by Eliza
For the workshop, I selected a collection of interesting photographs from Shorpy.com. The students could either draw and collage directly on the printed black and white photos, or download the image file and begin altering the image digitally. Then they could print their images, take photos of them, and continue the process using collage.
The first day, students seemed to get a slow start, and on the second day they got going right away and they made rapid progress!
Natalia used the collage technique on a digital image of a child in a forest. It has a fairy tale feel to it.
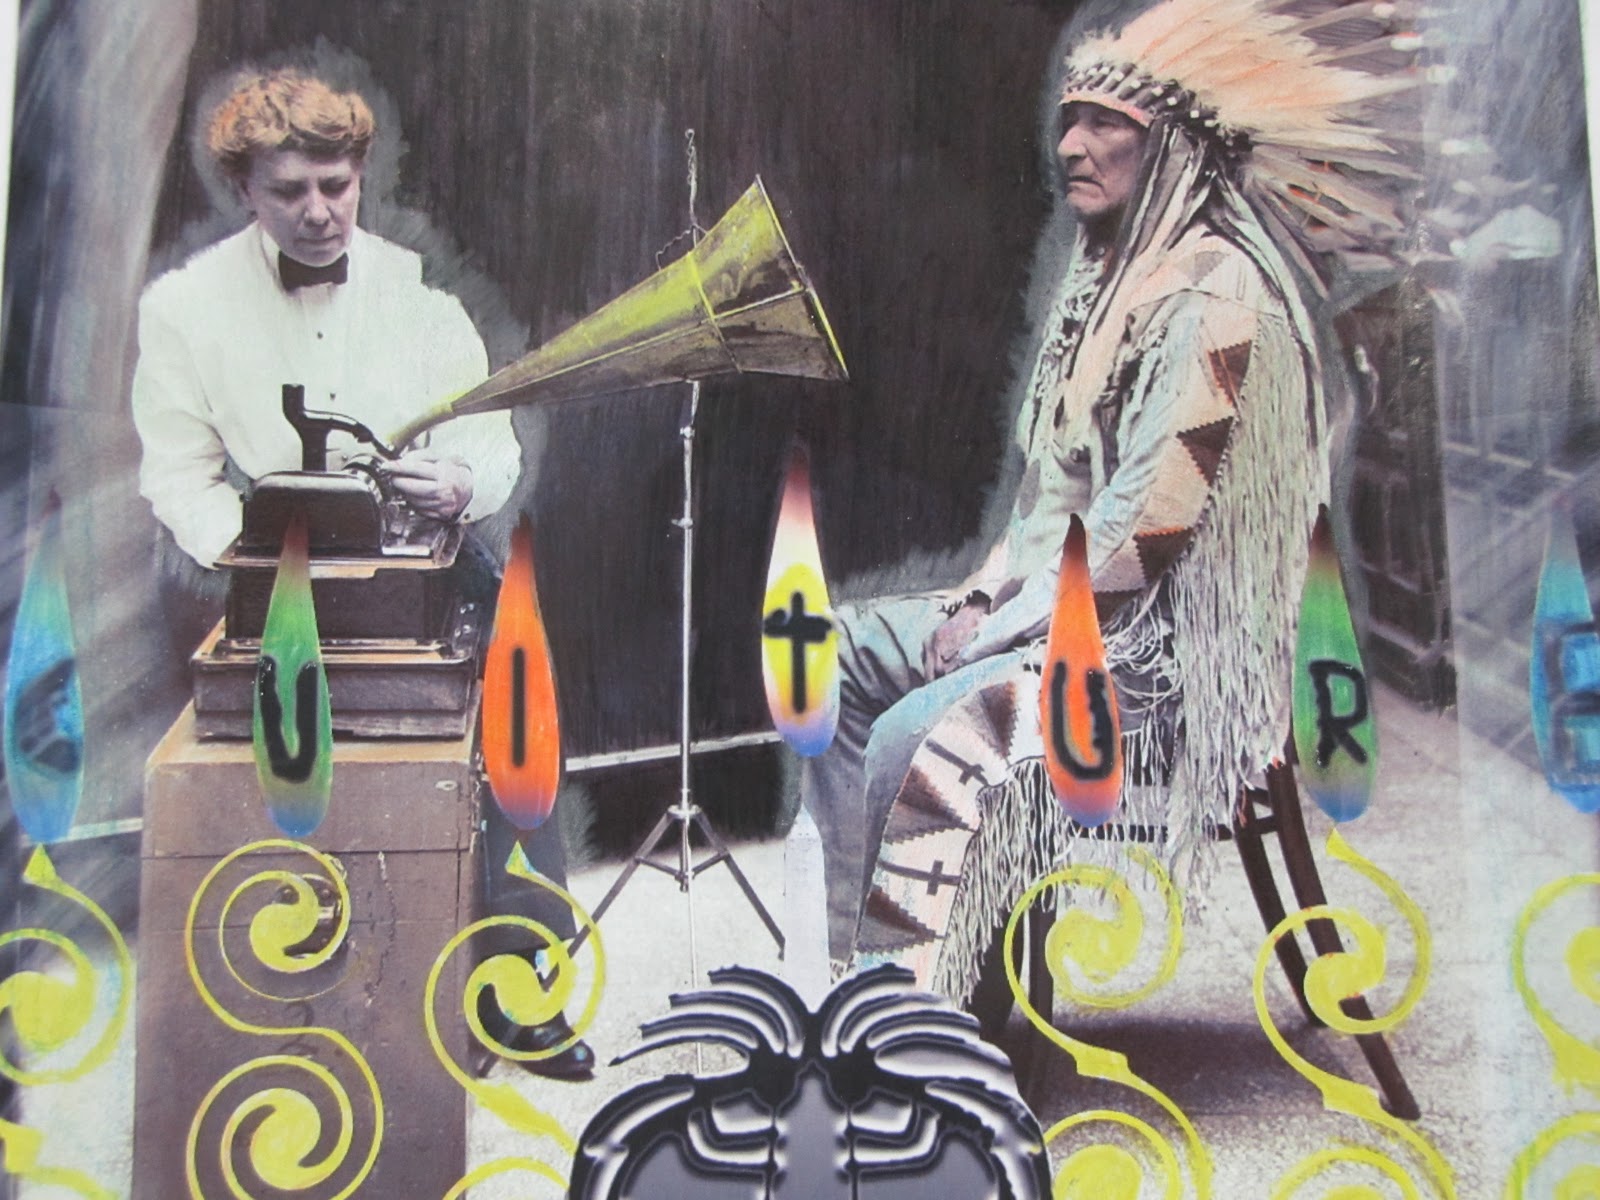
Jose worked on adding images to a old photo of a woman taking dictation from a Native American chief.
Patrick spent the second day working on an image of a lion. He was swirling out the edges of the lion's body which was giving it an otherworldly quality.
Aubrey was altering a picture of some strange-looking old-fashioned circus people. He added color and pasted some industrial buildings into the skyline.
Tenzin's boxing guys were turning into superheroes and he was planning on adding some effects to make them look like cartoons from the 50s or 60s.
Leija was combining several different photos, including photos of his friends, to make vampire creatures.
Kim brought some of her own drawings, which she had photographed and wanted to try working with in Adobe Illustrator.
Jeremy's artwork was based on an old photo of a smiling small person.
Eddie's piece shows thoughtful, careful work. He printed out a picture of a kindergarten classroom after the Chernobyl Disaster of 1986. He almost seamlessly transposed a photo of a child from the early 20th Century onto it. He worked really hard to cut out that image of the child and he pasted it on so that it looks like the child is holding the bar of one of the cribs.
Natalia used the collage technique on a digital image of a child in a forest. It has a fairy tale feel to it.
Jose worked on adding images to a old photo of a woman taking dictation from a Native American chief.
Patrick spent the second day working on an image of a lion. He was swirling out the edges of the lion's body which was giving it an otherworldly quality.
Aubrey was altering a picture of some strange-looking old-fashioned circus people. He added color and pasted some industrial buildings into the skyline.
Tenzin's boxing guys were turning into superheroes and he was planning on adding some effects to make them look like cartoons from the 50s or 60s.
Leija was combining several different photos, including photos of his friends, to make vampire creatures.
Kim brought some of her own drawings, which she had photographed and wanted to try working with in Adobe Illustrator.
Jeremy's artwork was based on an old photo of a smiling small person.
Eddie's piece shows thoughtful, careful work. He printed out a picture of a kindergarten classroom after the Chernobyl Disaster of 1986. He almost seamlessly transposed a photo of a child from the early 20th Century onto it. He worked really hard to cut out that image of the child and he pasted it on so that it looks like the child is holding the bar of one of the cribs.
Aubrey's image is impressive too. He added smokestacks and pollution and then colored his whole image to look like a smoggy day.
At the end of the second day, all the students were coming up with very interesting work, and I was really looking forward to watching the images evolve during the third session and to seeing the final results.
On the third day, we began with a quick and very effective lesson by Cristina on how to connect to an ITA network drive, where students could access, store, and share their work. Then, we spent the rest of the day working on our artwork. The students have all created some FANTASTIC pieces:
Kim had scanned in some of her own artwork at home, then she added a background in Adobe Photoshop and created an interesting cherry blossom design for her figure's clothing.
Kim's Cherry Blossom Kimono Picture
During the second week of class, Patrick unfortunately lost his first lion picture; he had not been saving his work and there was a problem with his computer, so after he rebooted, he was unable to retrieve his really great work. But, he did not let that stop him! He learned from the experience (he was saving constantly while working on his second picture!) and he created ANOTHER AWESOME one, done mostly in Photoshop. He added wings to the lion, and then put the whole figure into a completely different background. I really like the arc of light on the right. Very effective image and fantastic learning experience--way to go Patrick!!
Natalia's Child in the Woods is really fabulous too:
This is not her final product, though, because she has been adding some cut-out collage that really creates some interesting effects . . . those woods have eyes!
Juan finished his image of the Chief and then added some coloring effects on the final product. He used colored pencils on a print out, which he blended with his fingers. This made the surface smooth and glossy, adding an interesting dimension to the picture. After that, he scanned in his entire final product:
Jeremy used Photoshop and added construction paper collage to create a very amusing character:
Tenzin finished his image of two men boxing:
This custom workshop has been a success: everyone learned a lot, had some fun, tried something new, and made a project he or she can be proud of. As an instructor, I found it rewarding to share my own talents with the students and show them how technology can be part of our lives in an interesting and exciting way.
Labels:
Art,
Custom Workshop,
Graphic Design,
History,
Photography,
Photoshop,
Scanning,
Technology Labs,
Visual Arts
Subscribe to:
Posts (Atom)